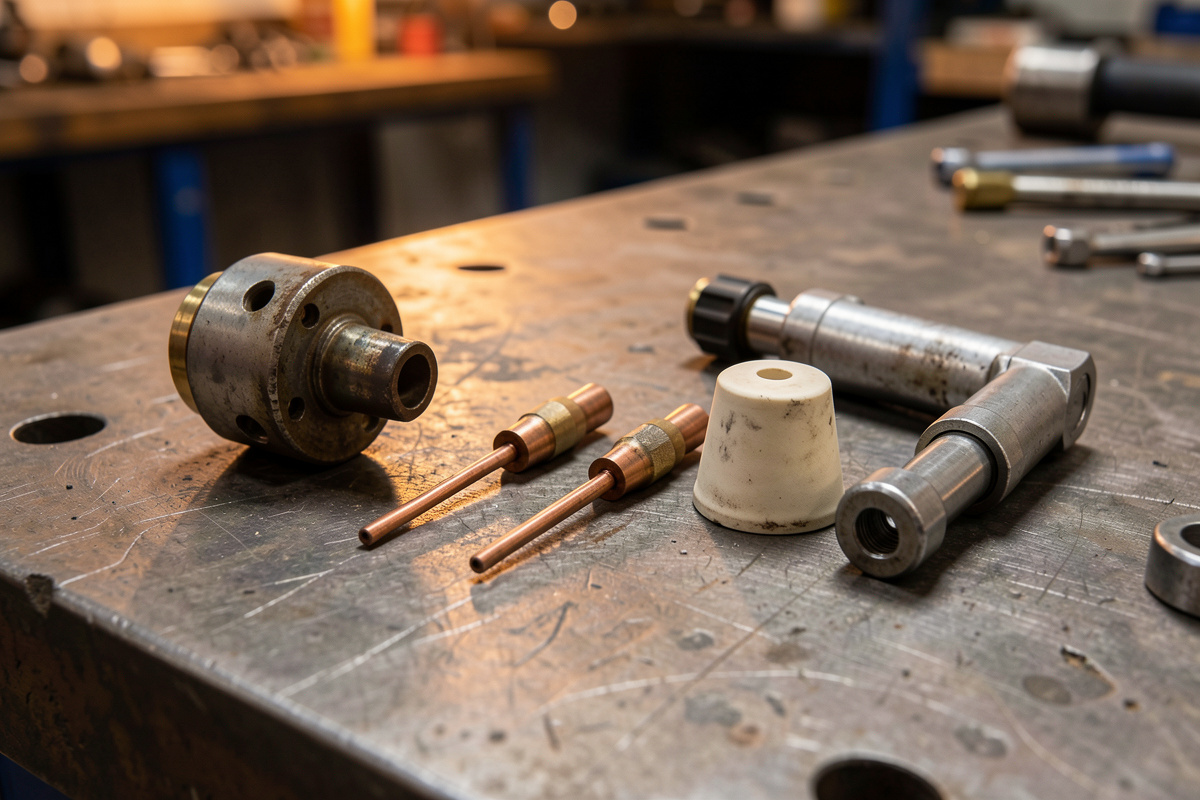

Plasma cutter consumables are the wear parts inside the torch head: the electrode, the nozzle (tip), the swirl ring, and the outer shield cup. On my YesWelder rig I get roughly 1 to 2 hours of arc-on time from a hafnium electrode and around 100 to 200 pierces from a nozzle before cut quality drops off, depending on amperage and how much I pierce versus edge-start.
Those numbers swing hard with how you cut. Heavy piercing chews the nozzle. Running at the wrong amperage for the orifice size burns the electrode early. Once you understand what each part does and how it fails, you stop blaming the machine for a cut that went bad because a 4-dollar tip was finished.
As an Amazon Associate I earn from qualifying purchases.
What Are the Main Plasma Cutter Consumables?
A plasma torch has four consumables that wear: the electrode, the nozzle (tip), the swirl ring (gas distributor), and the shield cup. The electrode and nozzle do the work and wear fastest; the swirl ring and shield last far longer. A retaining cap holds the stack together but is hardware, not a true consumable.
Here is how the stack works in order, from the inside out. The electrode sits deepest and carries the arc. Its tip holds a tiny pressed insert of hafnium, the metal that actually emits the arc. The swirl ring sits around the electrode and spins the air into a tight vortex so the arc column stays pinched and straight. The nozzle has the small orifice the pinched arc fires through, and that orifice diameter sets your amperage. The shield cup is the outermost piece that takes the molten spatter and keeps it off the nozzle. On a drag-cut torch, the shield is also the part that rides on the metal, which is why it pits first on cheap setups.
How Do You Know When the Electrode Is Worn Out?
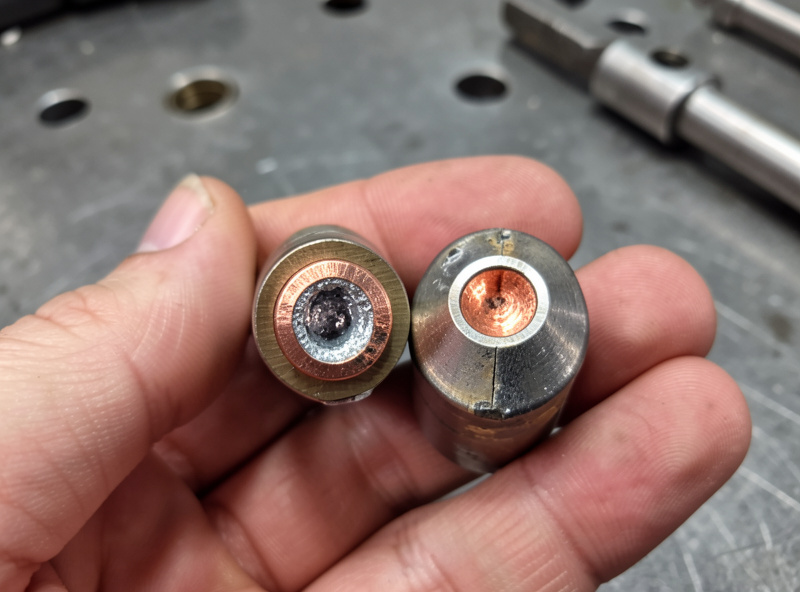
An electrode is finished when the hafnium pit in its center reaches about 0.04 inch (1 mm) deep, roughly the thickness of a credit card edge. Past that, the arc wanders, the cut angle drifts off square, and you risk the arc burning back into the copper, which can torch the nozzle and shield in one bad cut.
The pit is the tell. A fresh electrode has a flat or barely dimpled face; a worn one has a clear crater where the hafnium has eroded away. Torch manufacturers publish this as a hard limit in their service data: the common guidance, echoed in Hypertherm consumable datasheets, is to retire the electrode once the pit reaches roughly 0.04 inch (1 mm), and I treat that number as a ceiling, not a target. I keep a fresh electrode on the bench next to the one in the torch so I can eyeball the depth difference without guessing. When I am cutting all day, I check it every time I change a nozzle, because the two wear together and it is cheap insurance against a burn-back. Burn-back is the failure that actually costs money: lose the electrode and you usually lose the nozzle and the shield with it, turning a 4-dollar part swap into a 15-dollar one.
How Long Does a Plasma Nozzle Last?
A nozzle lasts roughly 100 to 200 pierces or 1 to 2 hours of edge-start cutting at matched amperage. The orifice erodes from round to oval, and once it does, the cut gets wider, leaves more dross, and pulls off square. Piercing is the killer because the blow-back of molten metal hits the orifice directly.
The single biggest mistake I see beginners make is running too low an amperage for the nozzle orifice, or the reverse. The orifice is sized for a current band. Push 45 amps through a 25-amp tip and you balloon the hole fast; run 25 amps through a 45-amp tip and the loose, cool arc leaves a ragged, drossy edge that looks like a worn tip even though it is brand new. Match the tip to the job. When I have to pierce a lot of holes in plate, I lift the torch slightly and start the pierce off the edge of the cut line where possible, or I let the molten puddle blow clear before plunging, so the nozzle is not eating its own slag.
Drag Cutting vs Standoff: Which Wears Consumables Faster?
Drag-cut consumables, where the shield rides directly on the metal, are more forgiving for handheld work but wear the shield faster on dirty or scaly steel. Standoff (non-contact) cutting at about 1/8 inch holds the tip off the work for cleaner cuts and longer nozzle life, but it demands a steady hand or a guide.
For everyday handheld cuts on clean stock I run drag tips, because keeping a consistent standoff freehand is genuinely hard and the contact tip lets me brace the torch on the work. The trade is shield life: mill scale and rust grind the drag shield down. For finish cuts or anything I am going to weld back together, I switch to a standoff setup with a roller guide or a straightedge so the orifice never touches metal. My welder friend Mike, who has been cutting steel for decades, drilled this into me early: a contact shield on a rusty I-beam is a consumable you are deliberately sacrificing for speed, and that is fine as long as you know you are doing it.
What Makes Plasma Consumables Wear Out Faster?
The four big consumable killers are moisture or oil in the air supply, amperage mismatch, excessive piercing, and starting the arc with the tip touching the work on non-drag setups. Of these, contaminated air is the one beginners overlook most, and it quietly halves consumable life across every part in the stack.
Plasma is brutal on air quality. Water and compressor oil that make it to the torch cause internal arcing, oxidize the hafnium faster, and leave you chasing porosity-like roughness on the cut that has nothing to do with the metal. The fume side is not optional either: ANSI Z49.1, the standard for safety in welding and cutting, treats local exhaust and clean breathing air as baseline, and plasma’s fine particulate is exactly the kind it is written for. I run a coalescing filter and a desiccant dryer downstream of my compressor, and I drain the tank every session. If you cut in a humid shop and skip air drying, you will burn consumables at two or three times the normal rate and never understand why. The same plume you are blowing off the cut is loaded with metal fume, so dry air and good extraction go together; I cover the shop side of that in my notes on welding ventilation for a home garage. The other quiet killer is pilot-arc abuse: dragging the trigger with no metal under the torch fires the pilot arc into open air, and every one of those wasted pilot starts erodes the electrode for nothing.
Are Aftermarket Plasma Consumables Worth It?
Genuine OEM consumables hold tolerances better and usually last longer per part, but quality aftermarket tips from a reputable maker can cut the same and cost 30 to 50 percent less. The trap is no-name bulk packs where the orifice diameters vary part to part, which shows up as inconsistent cut width across a single box.
I have run both on my torch. For a hobby cutter, well-reviewed aftermarket consumables that match your machine’s amperage are a reasonable way to stretch a budget, and I keep a stock pack of plasma cutter electrodes and nozzles on the shelf so a finished tip never stops a job. What I will not do is mix random bulk parts on a finish cut, because the one oversized orifice in the box is the one that ruins the piece you cared about. If you are choosing a machine in the first place, consumable cost and availability matter more than the headline duty cycle; I cover that trade in my guide to the best plasma cutter under 500 dollars.
How to Make Plasma Consumables Last Longer
You extend consumable life by drying your air, matching amperage to the tip, edge-starting instead of piercing where you can, and using the lowest amperage that still gives a clean cut. Together these habits can roughly double the parts life I started with: dry, matched, and patient beats brute force every time.
A few specifics from my bench. Pierce by lifting the torch to about twice your normal standoff so the blow-back clears the tip, then drop in once the puddle opens. Release the trigger the instant the cut finishes so the post-flow gas cools the electrode and shield instead of letting them sit hot. Keep a small parts box with at least two electrodes, two nozzles, and a spare shield so you never run a worn part “just to finish.” And clean the spatter off the shield with a wood stick, never a steel pick, which gouges the bore. For thin sheet where I want the cleanest possible kerf, I drop amperage and slow my travel; for thick plate I do the opposite. Reading the cut tells you which way to go, the same way reading the puddle does in welding. If your plasma keeps losing to a grinder on speed, that is usually worn consumables or a mismatched tip, not the machine, and I break that comparison down in plasma cutter vs angle grinder.
Plasma Consumable Wear and Replacement Guide
| Consumable | Typical Life | Failure Sign | Replace When |
|---|---|---|---|
| Electrode | 1-2 hrs arc-on | Deepening center pit | Pit reaches ~0.04 in (1 mm) |
| Nozzle (tip) | 100-200 pierces | Wide, drossy, off-square cut | Orifice goes oval |
| Swirl ring | Many tip changes | Cracks or clogged gas slots | Visible damage or arc wander |
| Shield cup | Varies with contact | Pitting, spatter buildup | Bore gouged or eroded |
Frequently Asked Questions
How often should I replace plasma cutter consumables?
Replace the electrode when its center pit reaches about 0.04 inch deep, and the nozzle after roughly 100 to 200 pierces or 1 to 2 hours of cutting. The electrode and nozzle wear together, so check both at every tip change.
Can I use a worn electrode a little longer?
Not safely. Once the hafnium pit passes about 1 mm, the arc can burn back into the copper and destroy the nozzle and shield in one cut. A 4-dollar electrode swap is cheaper than the burn-back it prevents.
Why do my plasma consumables wear out so fast?
The usual cause is moisture or oil in the air supply, followed by running the wrong amperage for the tip orifice and excessive piercing. Contaminated air alone can halve the life of every part in the torch stack.
Do I need genuine OEM consumables or are aftermarket fine?
Quality aftermarket tips from a reputable maker cut nearly the same as OEM for 30 to 50 percent less. Avoid no-name bulk packs where orifice diameters vary part to part and cut width becomes inconsistent.
What is the difference between drag and standoff consumables?
Drag tips ride on the metal and are easier for freehand cutting but wear the shield faster on dirty steel. Standoff tips hold about 1/8 inch off the work for cleaner cuts and longer nozzle life, but need a guide or steady hand.
Does drying my compressed air really make a difference?
Yes, significantly. Water and oil reaching the torch cause internal arcing and oxidize the hafnium faster. A coalescing filter plus a desiccant dryer can double consumable life and clean up cut quality at the same time.

Discussion (0)