TIG welding aluminum comes down to three dials most beginners never touch right: AC balance, AC frequency, and amperage. Get those set, clean the oxide, and a home AC/DC inverter lays a clean bead on 1/8-inch 6061 at around 125 amps.
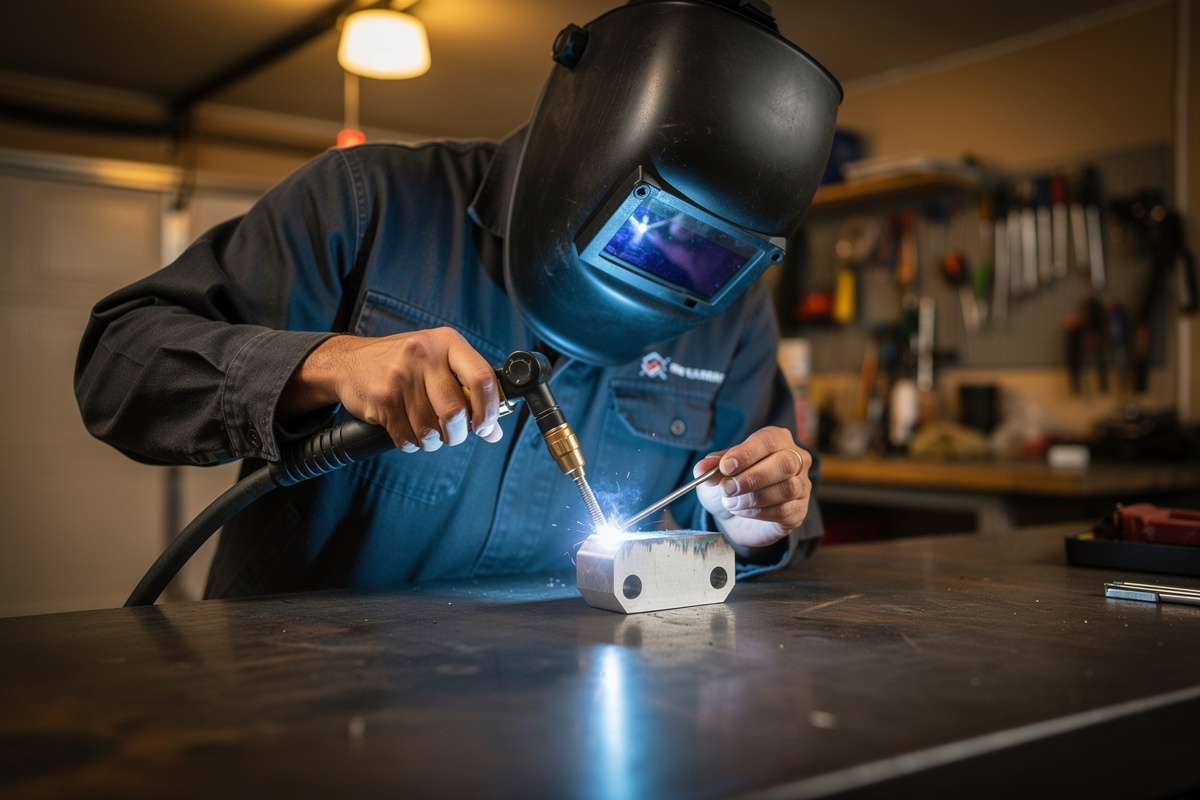
Aluminum was the metal that humbled me after a year of MIG. The first bead I ran on it looked like someone had dripped candle wax down the joint — gray, sooty, no shine. The problem was never my hand; it was the machine settings and a piece of oxide I had not cleaned off. Once I understood what AC current actually does and dialed the balance in, the puddle turned into the bright, mercury-like pool everyone shows on YouTube. This is the order I wish someone had handed me. For the broader process overview, start with the TIG welding guide; if you are still choosing a process, MIG vs TIG vs stick lays out where each one belongs.
Why Aluminum Needs AC Current
Aluminum needs alternating current because it grows a tough oxide skin that melts at about 3,700°F while the aluminum underneath melts at roughly 1,220°F. AC’s electrode-positive half-cycle blasts that oxide off so the electrode-negative half-cycle can melt clean metal.
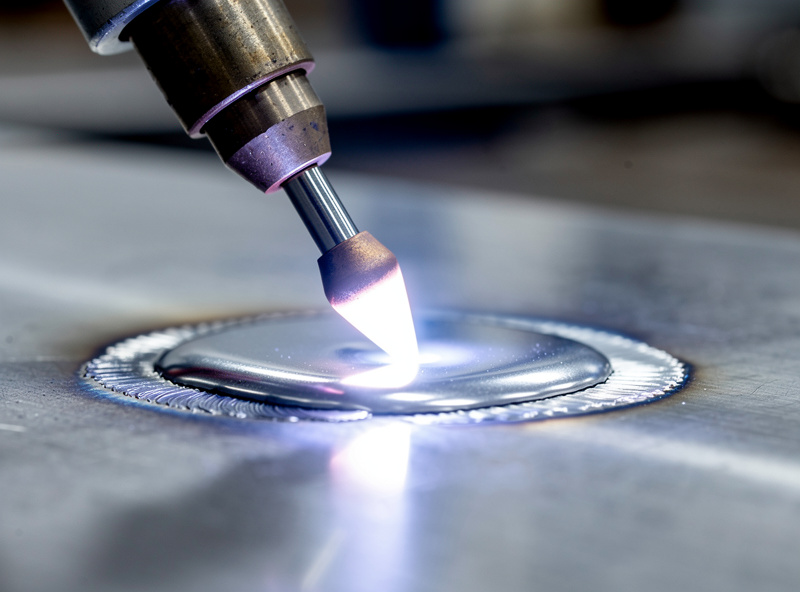
Run aluminum on straight DC the way you would steel and you get nothing but a dirty, refusing-to-wet puddle, because the oxide layer caps the joint like a lid on a pot. The full polarity breakdown is in AC vs DC TIG welding. That oxide is the whole reason TIG aluminum exists as its own skill. On the electrode-positive (EP) portion of each AC cycle, current flows out of the work and into the tungsten, and that reverse flow scours the oxide off the surface — you can literally watch a frosty etched zone appear ahead of your puddle. The trade-off is heat: EP dumps energy into the tungsten instead of the work, which is why aluminum tungstens run hotter and need to be sized up. The shielding gas matters here too — aluminum runs on straight argon, never a CO2 mix, as my welding gas guide explains; for aluminum the short version is: it is AC on pure argon, always.
Setting AC Balance and Frequency
On a modern inverter, AC balance is the percentage of each cycle spent in electrode-negative (penetration) versus electrode-positive (cleaning). Start at about 70% EN / 30% EP for clean 6061. Push toward 65% EN if the metal is oxidized; pull toward 75% EN once it is prepped and you want depth.
This is the dial that confuses everyone, partly because old transformer machines and new inverters label it differently. My YesWelder TIG-250P, like most current AC/DC inverters, reads balance as percent electrode-negative. More EP (a lower EN number) widens the frosty cleaning band and lets you weld dirtier aluminum, but it overheats the tungsten and eats your point. More EN drives penetration and keeps the tungsten cooler, but if you starve the cleaning action the puddle goes gray and stops wetting. I leave mine around 68-70% EN for general work and only drop to 62-65% when I am forced to weld something I could not scrub properly.
AC frequency is the second dial. Old machines were stuck at 60 Hz; an inverter lets you run 60-250 Hz. Higher frequency (120-200 Hz) tightens the arc cone into a narrow, focused column — better for thin fillet work and tight inside corners. Lower frequency (60-90 Hz) gives a broader, softer arc that fills wide joints faster. I keep 120 Hz as my everyday setting and only crank it up when I need a pencil-thin bead on a thin-wall enclosure.
Cleaning and Prep: The Step That Decides Everything
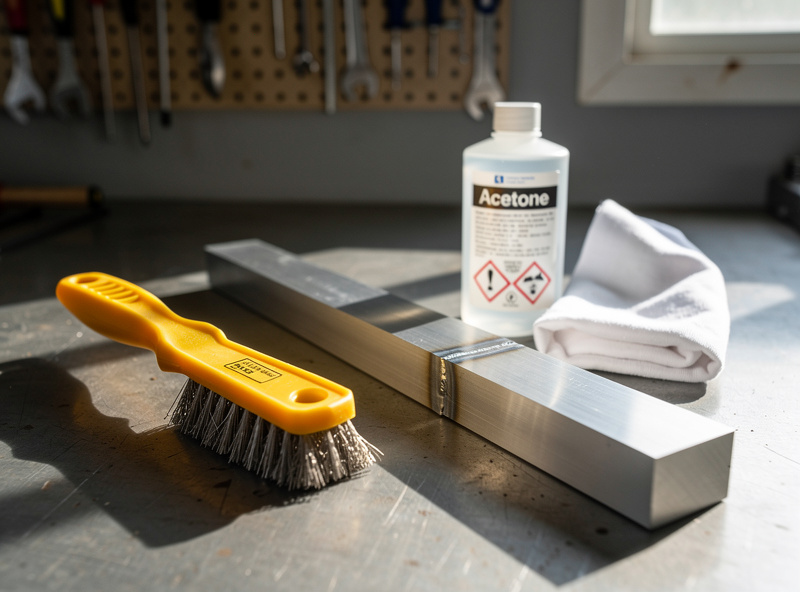
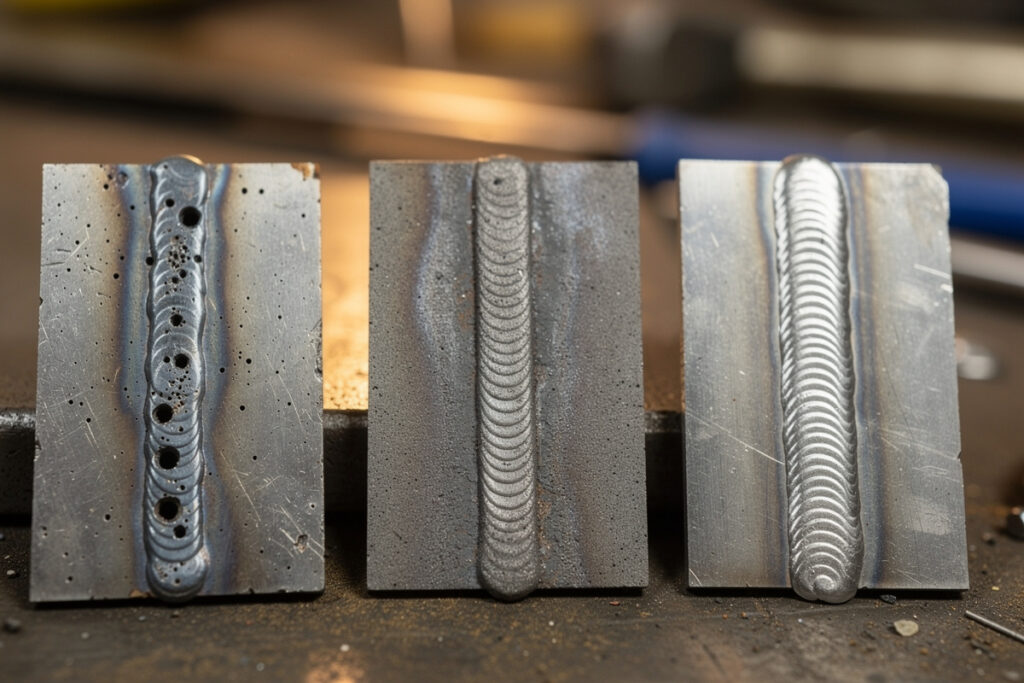
Aluminum prep is non-negotiable: scrub the joint with a dedicated stainless brush used only on aluminum, then wipe with acetone right before welding. Oxide and hydrocarbons are the number-one cause of porosity and that gray, sooty bead. Clean metal welds itself; dirty metal fights you all day.
The brush has to be stainless and it has to be aluminum-only — a brush that has touched steel drags carbon steel particles into your weld and seeds it with contamination. I keep a yellow-handled one zip-tied to the aluminum corner of the bench so it never wanders. Brush in one direction to lift the oxide, do not scrub it back into the surface. Then a clean rag and acetone to pull off cutting oil, fingerprints, and the brushing residue. Weld within a few minutes — the oxide layer starts rebuilding the moment you stop. On anything structural I also bevel and fit tight, because aluminum’s appetite for filling gaps is far smaller than steel’s. For choosing the alloy itself, my aluminum grades guide covers why 6061 and 5052 behave so differently under the torch.
Tungsten, Amperage, and Filler for Aluminum
For home aluminum on an inverter, run 2% lanthanated tungsten with a truncated point — it self-forms a small rounded ball and you do not need to deliberately ball it the way old pure-tungsten transformer setups required. Size amperage at roughly 1 amp per 0.001 inch, then add a margin: 1/8-inch 6061 likes 125-150 amps.
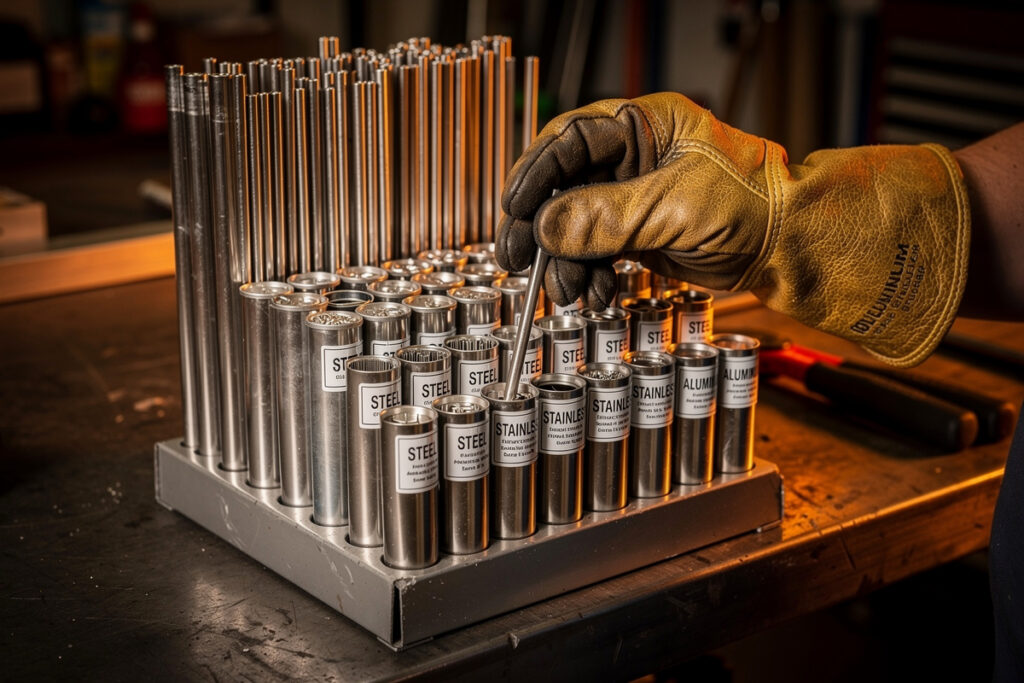
The old rule was “ball a pure (green) tungsten for AC.” On a modern AC/DC inverter that advice is outdated — 2% lanthanated (blue) or 2% ceriated holds up far better, starts more reliably, and forms its own small rounded tip after a few seconds of arc. I grind a truncated point on the dedicated wheel, strike an arc on scrap, and let it round itself. Size the tungsten up from what you would use on steel because EP heat is brutal: 3/32-inch covers most 1/16 to 3/16-inch aluminum, and I jump to 1/8-inch past 1/4-inch stock. The tungsten electrode color chart and the tungsten sharpening guide cover the grind specifics for each type.
For filler, 4043 is the forgiving general-purpose rod — it flows smoothly, resists cracking on thin 6061, and is what I reach for on brackets and enclosures. 5356 is stronger, stiffer to feed, and matches 6061’s color better if the part gets anodized, but it is more crack-sensitive on thin sections. Keep both on the tray and default to 4043 in 3/32-inch unless the job is load-bearing.
| Aluminum Thickness | Amperage (start) | Tungsten | Filler Dia. | AC Balance (EN) |
|---|---|---|---|---|
| 0.040 in (18 ga) | 40-55 A | 1/16 in lanthanated | 1/16 in | 70-72% |
| 1/16 in (0.063) | 60-80 A | 1/16 or 3/32 in | 1/16 in | 70% |
| 1/8 in (0.125) | 125-150 A | 3/32 in lanthanated | 3/32 in | 68-70% |
| 3/16 in (0.190) | 175-200 A | 3/32 in lanthanated | 3/32 in | 66-68% |
| 1/4 in (0.250) | 200-230 A | 1/8 in lanthanated | 1/8 in | 65-68% |
Disclosure: HomeWelder is reader-supported. As an Amazon Associate I earn from qualifying purchases made through links in this article, at no extra cost to you. I only point to gear I actually use or would buy for my own shop.
Running Your First Clean Aluminum Bead
Heat aluminum fast and move fast: it pulls heat away four times quicker than steel, so you start the puddle hard, then chase it before the whole part heat-soaks. Establish a shiny puddle, dip filler at the leading edge, and keep travel quick to avoid the wide, saggy pool that drops through thin stock.
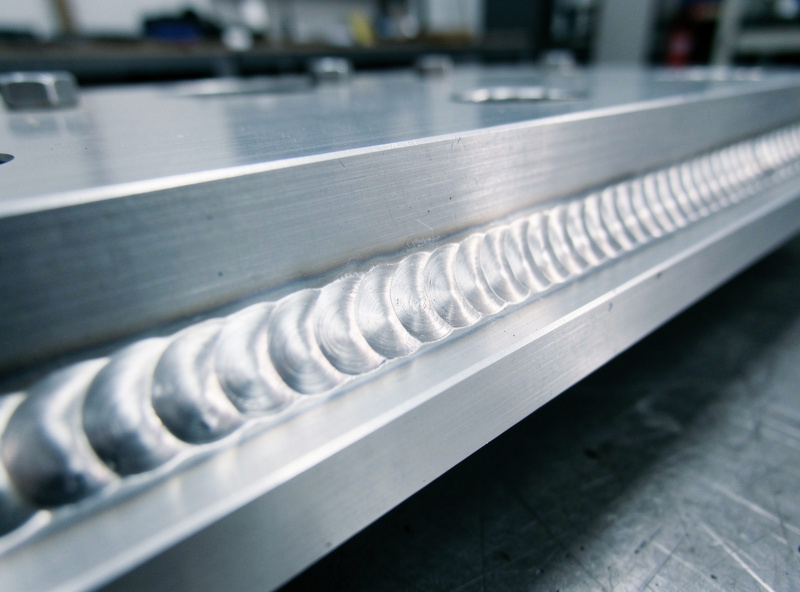
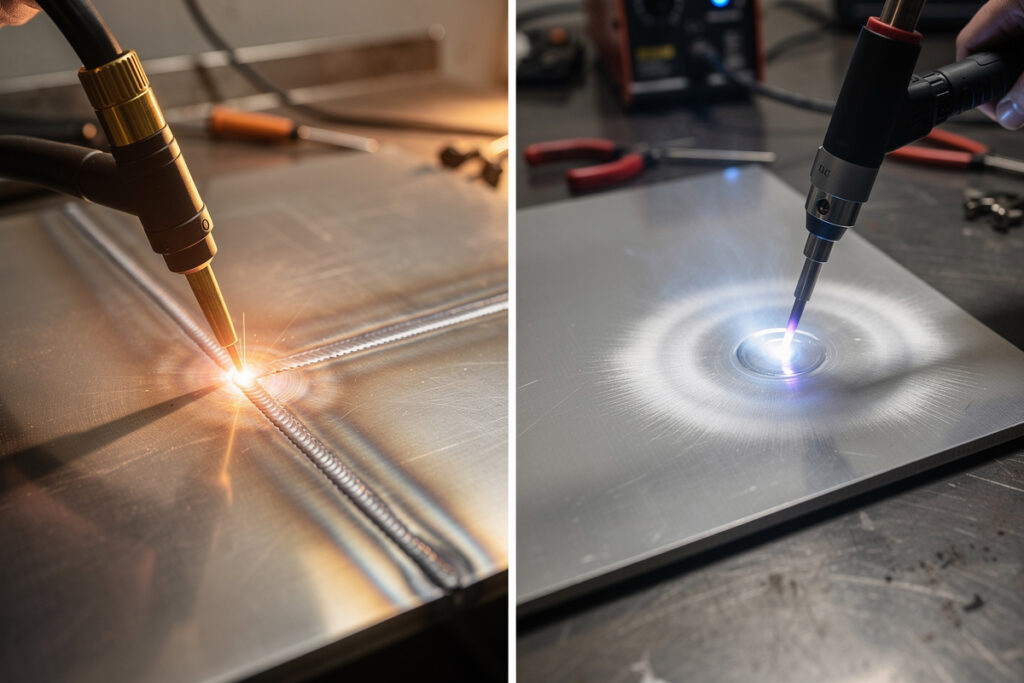
Here is my dial-in order on a fresh piece. Set the machine to AC, balance ~70% EN, frequency 120 Hz, amperage from the table, gas at 18-20 CFH of straight argon. Sharpen and mount the tungsten with a stick-out about equal to its diameter. Then I rest the cup edge near the start, stomp the pedal to bring up a puddle quickly, and the instant it goes shiny and mobile I start feeding 4043 into the front edge with the same dip-advance-dip rhythm I use on steel — just faster, because aluminum gives you less dwell time. Watch the puddle, not the tungsten. If it goes gray and stops shining, you have lost cleaning action or pushed the tungsten in; back off, clean, regrind, restart. The first time the puddle stays bright and the ripples stack evenly, you will feel it click. Aluminum is the metal that finally taught me to read a puddle by its shine instead of its sound.
The Gear That Made Aluminum Click
Three purchases moved my aluminum welds from sooty to shiny: good lanthanated tungsten, a gas lens to steady coverage, and filler I actually trust. None of it is expensive, but bargain-bin tungsten and mystery filler will sabotage a beginner who is already fighting the learning curve.
I run 2% lanthanated tungsten because it starts cleaner and self-rounds on AC without crumbling — a fresh pack of 3/32-inch lanthanated tungsten electrodes lasts me months. The single biggest coverage upgrade was swapping the standard collet body for a stubby gas lens; a 17-series gas lens kit turns the gas column into a smooth laminar flow that protects the puddle even with longer stick-out in a corner. And for filler I keep both 4043 and 5356 on the tray — a mixed pack of aluminum TIG filler rod lets you match the job instead of forcing one rod onto everything. My Tillman 1338 goatskin gloves give the finger feel aluminum dabbing demands; the heavier MIG gauntlets are too clumsy for it.
Frequently Asked Questions
Can I TIG weld aluminum with a DC-only welder?
No. Aluminum needs AC because the electrode-positive half-cycle removes the oxide layer that melts at 3,700°F. A DC-only TIG welder leaves that oxide intact, so the puddle stays gray and refuses to wet out. You need an AC/DC machine, which starts around $600 for a home unit.
What AC balance should a beginner use for aluminum?
Start at about 70% electrode-negative (30% EP) on a modern inverter for clean 6061. Drop to 62-65% EN if the metal is oxidized and needs more cleaning, or raise toward 75% EN once it is prepped and you want deeper penetration with a cooler tungsten.
Do I need to ball the tungsten for AC aluminum?
Not on a modern AC/DC inverter. Run 2% lanthanated or ceriated tungsten with a truncated point and it self-forms a small rounded tip after a few seconds of arc. Deliberate balling was only needed for pure (green) tungsten on old transformer machines.
Why does my aluminum TIG bead turn gray and sooty?
A gray, sooty bead means contamination or lost cleaning action: oxide and oil left on the joint, too little electrode-positive balance, a dirty tungsten, or low gas flow. Scrub with an aluminum-only stainless brush, wipe with acetone, and weld within a few minutes before the oxide rebuilds.
How many amps to TIG weld 1/8-inch aluminum?
Start around 125-150 amps for 1/8-inch 6061 with a foot pedal so you can back off as the part heats. Aluminum needs more amperage than equal-thickness steel because it conducts heat about four times faster, pulling energy away from the weld zone.
What filler rod is best for TIG welding 6061 aluminum?
4043 is the best all-purpose filler for 6061 — it flows smoothly and resists cracking on thin sections. Use 5356 for higher strength or when the part will be anodized, since it color-matches better, though it is stiffer to feed and more crack-sensitive on thin stock.
Discussion (0)