TIG welding produces the highest quality welds of any arc welding process by using a non-consumable tungsten electrode and separate filler rod. A TIG welder on 100-150 amps welds 24-gauge stainless to 1/4-inch mild steel with clean, spatter-free beads.
I added a TIG welder to my shop two years after the MIG, and the first thing it changed was the projects I would attempt. Stainless food-prep tables, aluminum motorcycle brackets, the chromoly on a friend’s vintage bike — none of those work cleanly on MIG, and welding the chromoly 4130 in particular has its own cooling-rate discipline. The trade-off is the learning curve: my first TIG bead looked like cooked oatmeal, and dropping the tungsten in the puddle on bead #3 cost me 20 minutes of regrinding before I could continue. This guide covers equipment setup, tungsten selection, filler rod matching, technique, and the differences between TIG aluminum and TIG steel. For first-time-welder context, see welding for beginners; for the MIG-first foundation most welders build on, see the MIG welding complete guide and MIG vs TIG vs stick.
How TIG Welding Works
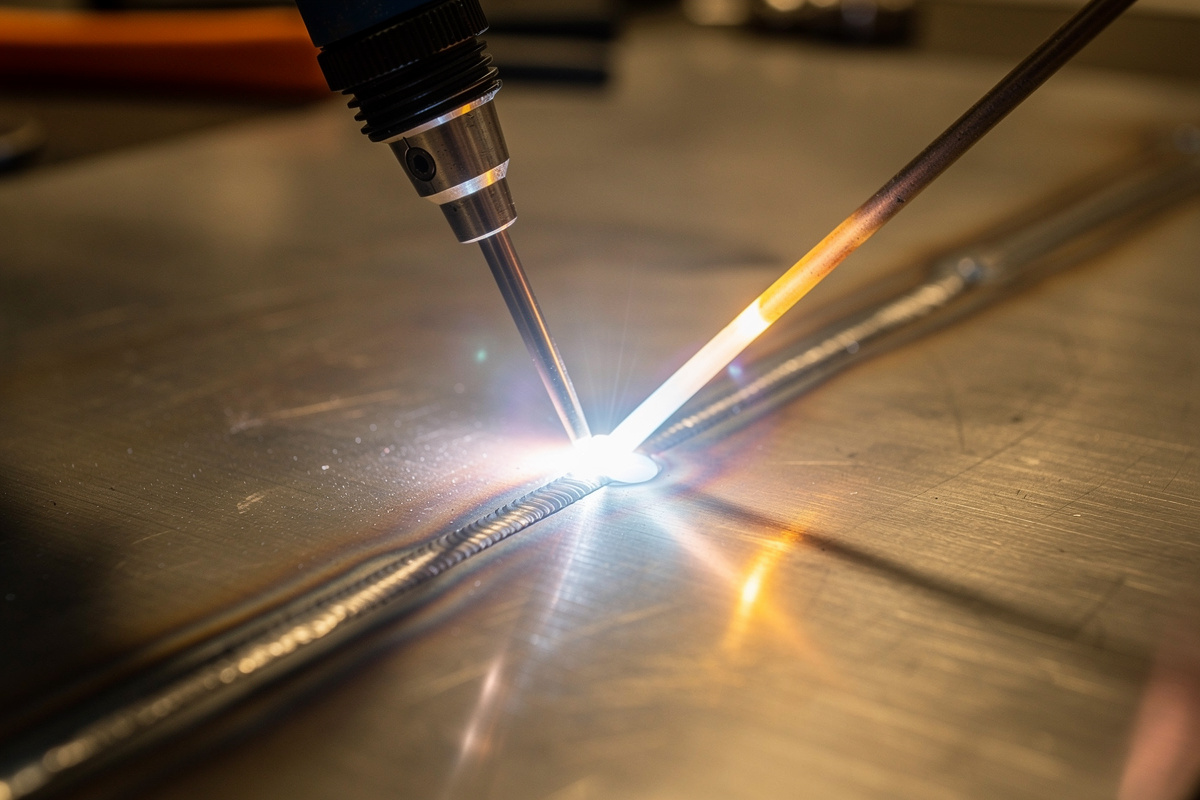
TIG welding creates an arc between a tungsten electrode and the workpiece while shielding the arc zone with inert gas — usually 100 percent argon. The arc melts the base metal to form a molten puddle, and the operator manually feeds filler rod into the puddle to build up the weld bead. Unlike MIG, the electrode does not melt — it only carries the current.
The TIG torch holds the tungsten electrode inside a ceramic cup that directs shielding gas flow. The operator holds the torch in one hand and the filler rod in the other, requiring independent coordination of both hands — torch movement, filler dipping, and amperage control (via foot pedal or fingertip remote) simultaneously. This three-way coordination is why TIG has the steepest learning curve of all arc welding processes.
TIG machines are constant-current (CC) power sources, either AC/DC transformer or AC/DC inverter. AC mode is required for aluminum because the alternating current cleans the aluminum oxide layer during the electrode-positive half-cycle while melting the base metal during the electrode-negative half-cycle. DC mode (electrode negative) is used for steel, stainless, and chromoly; the full polarity breakdown is in AC vs DC TIG welding. A basic DC-only TIG welder handles steel and stainless starting at $300. An AC/DC TIG welder for aluminum costs $600-$2,000+. The complete buyer’s logic on machines and PPE is in the essential welding equipment guide.
TIG Welding Equipment Setup
Proper setup eliminates the variables that frustrate new TIG welders. Configure your machine, torch, gas, and tungsten before touching filler rod to base metal.
Set your machine to DCEN (direct current electrode negative) for steel and stainless, or AC for aluminum. Set amperage to approximately 1 amp per thousandth of material thickness — 1 amp per 0.001 inch. For 16-gauge steel (0.060 inch), start at 60 amps. For 1/8-inch steel, start at 120 amps. Use a foot pedal for amperage control so you can back off the heat as the puddle grows on thinner sections.
Set shielding gas to 100 percent argon at 15-20 CFH for most TIG welding. Argon provides the stable, concentrated arc column that TIG requires. Never use CO2 or argon/CO2 mix with TIG — the CO2 breaks down at arc temperature and contaminates the tungsten. For aluminum over 1/4-inch, a helium/argon mix (75/25 or 50/50) increases penetration and travel speed, but 100 percent argon works for all hobbyist aluminum thicknesses.
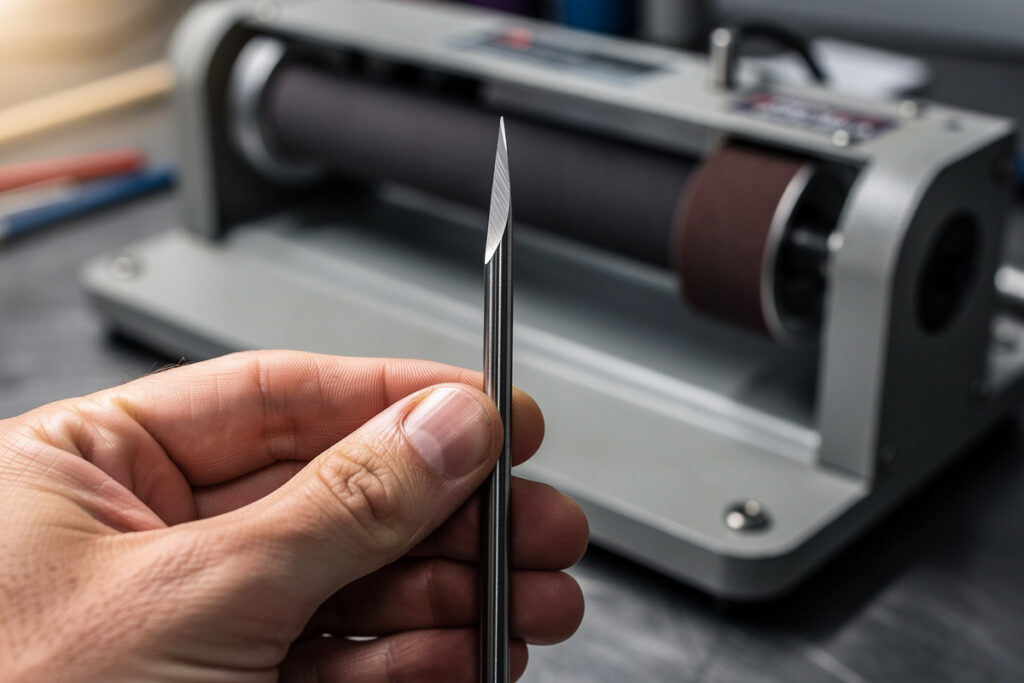
Select the correct tungsten electrode for your process and amperage. See the tungsten selection section below for specifics. Grind the tungsten to a sharp point for DC welding; for AC aluminum on a modern inverter, grind a truncated point and let 2% lanthanated self-form a small rounded tip (deliberate balling is only needed for pure tungsten on old transformer machines). Stick-out distance from the cup should be roughly equal to the tungsten diameter — 1/8-inch tungsten gets 1/8 to 3/16 inch of stick-out. Longer stick-out gives better visibility but reduces gas coverage — a gas lens restores it, as the TIG torch parts guide explains.
Check all connections: gas hose fittings, torch-to-machine connection, ground clamp, and water line if using a water-cooled torch. A leaking gas connection reduces flow at the torch and causes porosity. A loose ground clamp produces an erratic arc that wanders across the workpiece. Verify gas flow by holding the torch over a piece of paper — you should feel steady gas flow with no pulsing.
Tungsten Electrode Selection
Tungsten electrode type and size directly affect arc stability, starting ease, and maximum amperage. Choosing the wrong tungsten is the number one cause of new TIG welder frustration.
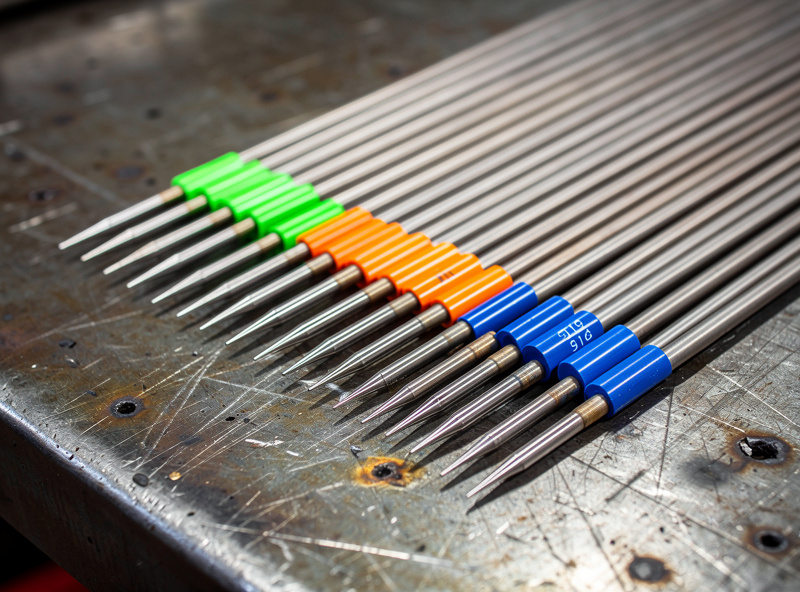
The three common tungsten types for home TIG welding are pure tungsten (green band), 2% ceriated (orange band), and 2% lanthanated (blue band). Pure tungsten balls naturally on AC and is the traditional aluminum electrode. Ceriated and lanthanated tungsten hold a sharp point on DCEN and start more reliably at low amperage than pure tungsten. For a home welder who TIG welds both aluminum and steel, 2% lanthanated (blue) is the best all-purpose tungsten — it self-rounds to a small tip for AC aluminum and points for DC steel without switching electrodes.
Tungsten diameter must match your amperage range. Using too small a tungsten at high amperage causes it to melt, contaminate the weld, and spit into the puddle. Using too large a tungsten at low amperage produces a wandering arc that is hard to control. The tungsten electrode color chart shows the recommended diameter for each amperage range and metal type.
For home TIG at amperages under 200 amps, 3/32-inch tungsten covers 90 percent of applications. It handles 60-200 amps DCEN and 60-150 amps AC. Keep a pack of 3/32-inch 2% lanthanated as your default. Add 1/16-inch for thin stainless and sheet metal work under 60 amps, and 1/8-inch for heavy aluminum over 200 amps. The tungsten sharpening guide covers proper grind angle, technique, and maintenance for each electrode type.
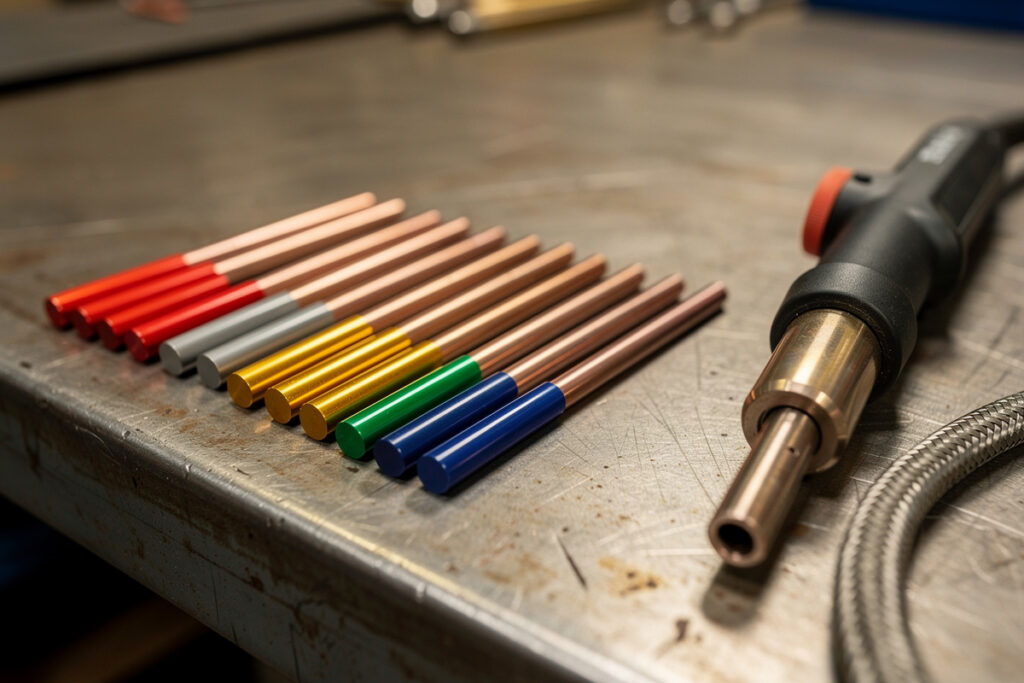
Filler Rod Selection
Filler rod adds metal to the weld joint and must match or complement the base metal composition. Using the wrong filler produces weak, crack-prone welds that fail under load.
For mild steel, ER70S-2 is the standard TIG filler rod. It contains deoxidizers that handle light mill scale and produces strong, ductile welds. ER70S-6 (the same wire used in MIG) also works but produces slightly more fume under the TIG arc. Common diameters are 1/16-inch for thin material and 3/32-inch for 1/8-inch and thicker. Buy 36-inch rods in 1-pound packages — a $10-15 pack of ER70S-2 3/32-inch lasts most hobbyists 6-12 months.
For 304 stainless steel, use ER308L filler rod (per AWS A5.9). The “L” designation means low carbon, which helps prevent the intergranular corrosion that carbide precipitation causes in the heat-affected zone. For 316 stainless, use ER316L. Never use mild steel filler on stainless — the first stainless tray I welded with mild steel filler rusted at every weld within four months and I had to cut and re-weld every joint with proper 308L. AWS A5.9 names the matching grades for every common stainless alloy; check it before you buy filler. The deeper dive on heat input, sugaring, and argon backpurging is in TIG welding stainless steel.
For 6061 aluminum, use 4043 filler rod (per AWS A5.10) for general fabrication or 5356 for higher strength applications. 4043 flows more smoothly and produces less crack sensitivity on thin aluminum. 5356 is stronger and matches the color of 6061 better when anodized after welding. For a single all-purpose aluminum filler, choose 4043 in 3/32-inch diameter. The full consumables breakdown is in the welding consumables guide, and the rod-by-rod matching rules are in the TIG filler rod guide.
TIG Welding Technique Basics
TIG technique requires coordinated hand movement, consistent arc length, and controlled filler rod addition. Unlike MIG where the machine controls deposition rate, TIG puts you in complete control of heat input and filler addition.
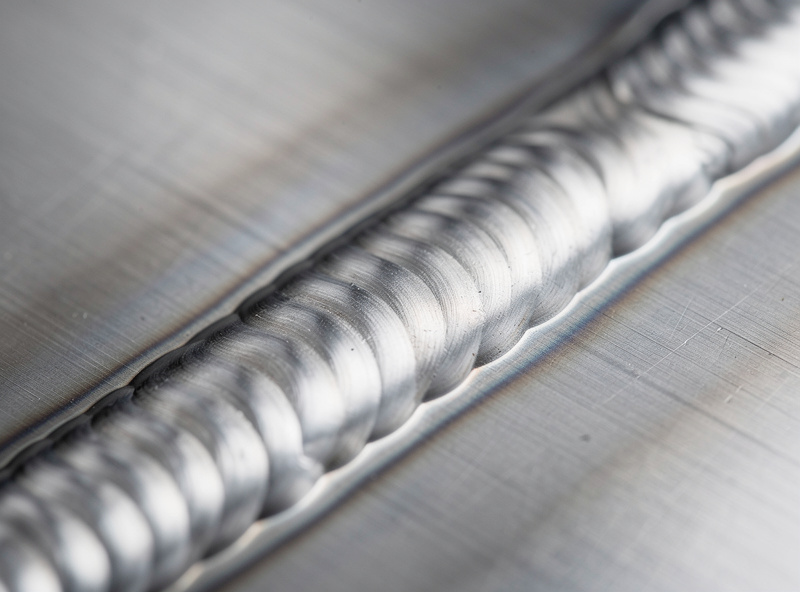
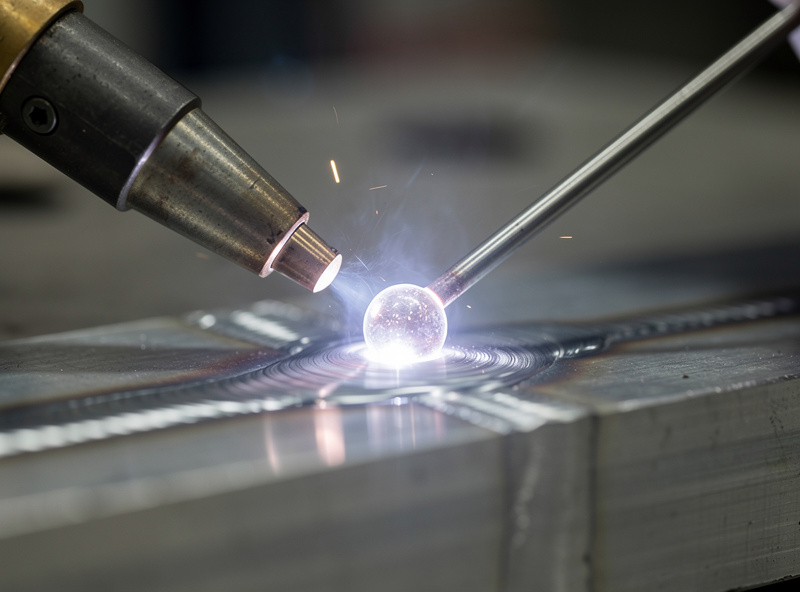
Establish the arc at the starting point by pressing the foot pedal to initiate current flow. The arc should produce a clear, focused puddle that is round and shiny. Hold the torch at a 15-20 degree drag angle (pointing backward into the puddle) with 1/8 to 3/16 inch of arc length. Move the torch along the joint at a steady speed that maintains a puddle diameter of 2-3 times the material thickness. Watch the tungsten color as you weld — silver-gray to gold to blue to pink is the warning ladder of an electrode getting too hot or too contaminated; pink means stop, regrind, restart.
Feed filler rod into the leading edge of the puddle with a smooth dipping motion. Do not push the rod into the arc center — this contaminates the tungsten. Touch the rod to the puddle edge, let the puddle melt a small dab of filler, withdraw the rod, advance the puddle, and repeat. The rhythm is dip-advance-dip-advance. Speed and dab size control bead width and reinforcement height.
For autogenous welds (no filler rod), simply run the torch along the joint and let the arc melt both edges together. This works on tight-fitting butt joints in material under 16-gauge. The resulting bead is clean with no filler metal protrusion — ideal for cosmetic seams on stainless exhaust tubing and thin aluminum enclosures. Keep arc length extremely short for autogenous welding to concentrate heat in the joint.
Foot pedal control is the defining TIG skill. Start at full amperage to establish the puddle, then back off as the base metal heats up along the joint. On thin material, you may run at 50-70 percent pedal most of the time with brief full-pedal bursts to start each puddle. Practice on scrap before touching your project. The difference between a beginner TIG bead and an experienced one is pedal modulation — smooth amperage transitions produce smooth bead profiles. The two ways to steer the torch are compared in walking the cup vs freehand TIG.
TIG Welding Aluminum vs Steel
TIG welding aluminum and steel use the same machine and torch but require completely different settings, technique, and preparation. Understanding these differences prevents the frustration of trying to weld aluminum with steel settings. My full TIG welding aluminum walkthrough covers AC balance, frequency, oxide prep, and the first-bead dial-in.
Aluminum requires AC mode (or AC/DC pulse), pure or lanthanated tungsten with a balled tip, 100 percent argon, and higher amperage than equivalent steel thickness. The AC cycle cleans the aluminum oxide layer — which melts at roughly three times the temperature of the base aluminum (about 3,700°F versus aluminum’s 1,220°F) — while simultaneously melting the base metal. The balled tungsten tip is formed by running the arc on AC for 3-5 seconds — the electrode-positive half-cycle melts the tungsten tip into a ball.
Steel requires DCEN mode, sharp-pointed tungsten (ceriated or lanthanated), 100 percent argon, and lower amperage than aluminum. DCEN concentrates heat at the workpiece for maximum penetration. The sharp tungsten point focuses the arc for precise puddle control on thin material. Steel TIG welding is more forgiving than aluminum because steel’s higher melting point (2,500°F) and lower thermal conductivity give you more time to manipulate the puddle before it solidifies.
Aluminum conducts heat 4 times faster than steel, which means the heat zone spreads rapidly and thin sections warp easily. Use a heat sink (aluminum or copper block clamped behind the joint) on thin aluminum to absorb excess heat and prevent burn-through. Move faster on aluminum than steel — a slow travel speed on aluminum produces a wide, saggy puddle that drops through on material under 1/8-inch.
Comparison Table: TIG vs MIG vs Stick
| Feature | TIG (GTAW) | MIG (GMAW) | Stick (SMAW) |
|---|---|---|---|
| Weld Quality | Best — precise, no spatter | Good — clean with gas | Good — slag removal required |
| Speed | Slowest — manual filler | Fastest — continuous feed | Moderate — electrode changes |
| Learning Curve | Hardest — 2-hand + pedal | Easiest — point and shoot | Moderate — electrode control |
| Aluminum | Excellent — primary use | Possible with spool gun | Difficult — special rods |
| Stainless Steel | Excellent — cleanest welds | Good with tri-mix gas | Good with correct rod |
| Thin Material (24-20 ga) | Best — precise heat control | Good — fast enough | Poor — hard to control |
| Thick Material (3/8+) | Slow but capable | Good — high deposition | Best — deep penetration |
| Position Welding | All — best control | All positions | All — with skill |
| Equipment Cost | $300-$2,000+ | $200-$800 | $100-$500 |
| Consumables Cost | Medium — tungsten, gas, filler | Low — wire + gas | Lowest — electrodes only |
TIG welding is the right choice when weld appearance is critical, when welding thin material, when joining stainless or aluminum, or when you need the absolute strongest weld possible. MIG welding is the right choice for speed, productivity, and thicker mild steel projects. Most home welders start with MIG and add TIG capability after 6-12 months of practice. Having both processes covers every welding scenario a home shop encounters.
TIG Welding Practice Progression
TIG skill development follows a predictable progression. Practice each step until you can perform it consistently before moving to the next. Rushing through the progression produces poor technique that is harder to correct later than learning properly from the start.
Start with straight beads on 16-gauge mild steel plate using DCEN. Do not use filler rod yet — just run autogenous beads to learn arc length control and travel speed. Goal: consistent bead width and color with no discoloration from oxidation (indicates good gas coverage). Practice until you can lay 6-inch beads with uniform width and minimal color change.
Add filler rod on flat plate. Dab 3/32 ER70S-2 into the puddle at consistent intervals while maintaining travel speed. Goal: uniform bead profile with consistent ripples. The bead should be silver to light gold — dark blue or black discoloration means insufficient gas coverage or too much heat.
Progress to joint welding: butt joints, lap joints, and T-joints on 16-gauge plate. Focus on penetration without burn-through and toe fusion at both edges of the joint. Goal: full-penetration butt welds with uniform reinforcement on the back side. Use scrap pieces cut to 3×3 inch coupons so you can practice 20-30 joints in an hour.
Move to tube welding on thin-wall square tube (16-gauge, 1-inch square). Practice fillet welds along tube intersections. This simulates real project welding like sim rig frames and furniture. Goal: consistent fillet size along the full joint length with no burn-through at corners. The sim rig frame build demonstrates tube welding techniques applied to a real project. The DIY welding projects guide covers the broader project ladder. Safety and ventilation context is in the welding safety guide and welding ventilation home garage; for plasma cutting and metal prep before welding, see the plasma cutting guide; for defect diagnosis after, the welding troubleshooting guide.
The Single Habit That Separates Good TIG From Bad
If you take only one thing from this guide, take this: never let the tungsten touch the puddle. The dropped-tungsten contamination is what separates 30-second beads from 30-minute regrind sessions, and it is the single most common reason new TIG welders abandon the process. Every contaminated tungsten contaminates the next 2-4 inches of weld with tungsten inclusions that show up under load as cracking or premature fatigue — the kind of internal defect that inspection-grade fusion-welding codes treat as a hard reject, not a cosmetic issue. The discipline that fixes it: dip the rod into the puddle’s leading edge from outside the arc cone, never push the rod into the arc center, and stop welding the moment your tungsten goes from silver to pink. The hour I lost in my first month to dropped tungstens has paid back many times over in faster project completion since I built that habit. For the rest of the failure modes, see common TIG welding defects.
Frequently Asked Questions
What tungsten do I use for TIG welding steel?
Use 2% ceriated (orange band) or 2% lanthanated (blue band) tungsten sharpened to a sharp point for TIG welding steel on DCEN. 3/32-inch diameter handles 60-200 amps, covering most home steel welding. Pure tungsten (green) should only be used for AC aluminum — it does not hold a point on DCEN.
Can a MIG welder do TIG welding?
No, MIG and TIG are different processes requiring different machines. MIG machines output constant voltage with wire feed — TIG requires constant current output with high-frequency start capability. However, some multi-process welders ($500-1,500) include both MIG and TIG modes in one machine. A dedicated TIG-only machine produces better arc quality than a multi-process unit at the same price point.
What gas do I need for TIG welding?
100 percent argon is the standard shielding gas for all TIG welding. Use 15-20 CFH flow rate. Never use CO2 or argon/CO2 mix for TIG — CO2 contaminates the tungsten electrode. For aluminum thicker than 1/4-inch, a helium/argon mix (75/25) increases penetration and travel speed, but 100 percent argon handles all hobbyist aluminum thicknesses.
How do I prevent burn-through when TIG welding thin metal?
Reduce amperage (1 amp per 0.001-inch thickness), use 1/16-inch tungsten for material under 18-gauge, maintain a tight 1/16-inch arc length, and increase travel speed. On aluminum under 16-gauge, clamp an aluminum or copper heat sink behind the joint to absorb excess heat. Pulse welding mode (if your machine has it) reduces average heat input by alternating between high and low amperage.
Is TIG welding stronger than MIG?
TIG and MIG welds on the same material with matching filler wire achieve the same tensile strength when properly executed. The advantage of TIG is more precise heat control, which produces a narrower heat-affected zone with less base metal degradation. On thin material, TIG is more reliable because it gives you direct control over heat input that MIG automation cannot match.
What is the best filler rod for TIG welding aluminum?
4043 filler rod is the best all-purpose TIG filler for 6061 aluminum. It flows smoothly, resists cracking, and works on material from 16-gauge through 1/4-inch. Use 3/32-inch diameter for most applications. 5356 filler is stronger and color-matches 6061 better for anodized parts, but is more crack-sensitive on thin material.
How long does it take to learn TIG welding?
Basic competency on flat mild steel plate takes 10-15 hours of practice. Producing cosmetic welds on stainless takes 30-50 hours. Aluminum TIG welding requires 50-100 hours to develop consistent skill. Most home welders reach project-ready TIG skill on steel in 2-3 months of weekly practice sessions. TIG on aluminum takes 4-6 months of regular practice.
Related Articles
- How to Sharpen Tungsten for TIG Welding
- Tungsten Electrode Color Chart
- MIG Welding Settings Chart
- Welding a Steel-Tube Sim Rig Frame
- Welding Porosity Causes and Fixes
- MIG Welding Complete Guide
- Welding for Beginners
- Essential Welding Equipment Guide
- Welding Safety Guide
- Welding Troubleshooting Guide
- Welding Consumables Guide
- Plasma Cutting and Metal Prep Guide
- DIY Welding Projects Guide
- Best Welding Helmet for Home Use
- MIG vs TIG vs Stick

Discussion (0)