
Essential welding equipment includes a welder, auto-darkening helmet, gloves, angle grinder, clamps, and consumables. A complete MIG welding setup costs $400-$800 and covers everything a home welder needs for the first year of practice and project building.
Choosing the right welding equipment depends on three variables: which welding process you are using (MIG, TIG, or stick), the thickness of metal you plan to weld, and whether you need portability. After buying my first welder twice (returned a 90-amp 110V unit because it could not run a single-pass bead on 1/8″ plate, swapped to a 140-amp dual-voltage machine), I now tell every beginner to size up rather than down on amperage — the $50 difference saves the return trip. This guide covers every piece a home welder needs, explains what each item does, and recommends categories by budget and use case.
Quick-Reference: Welder Type vs Price Tier vs Use Case
| Welder Type | Budget Tier ($) | Mid Tier ($) | Pro Tier ($) | Best Use Case |
|---|---|---|---|---|
| MIG (110V) | 200-450 — Forney Easy Weld 261, YesWelder MIG-205DS-Pro | 500-950 — Hobart Handler 210MVP | 1500+ — Miller Multimatic 215 | Hobbyist projects, sheet to 1/4″ steel, fastest learning curve |
| MIG (220V) | 400-600 — Eastwood MIG 175, YesWelder MIG 250 | 1200-2000 — Lincoln Power MIG 210 MP | 2400+ — ESAB Rebel EMP 215ic ($2,400-3,600), Miller Millermatic 252 (runs well past $6,000) | Trailers, structural work, plate above 3/16″ |
| TIG (DC only) | 300-650 — Lotos TIG200D, PrimeWeld TIG200-D | Dedicated DC-only units thin out above $650 — most buyers step up to an AC/DC machine here instead | 1500+ — Lincoln Square Wave 200 | Stainless food-grade, chromoly, cosmetic mild steel |
| TIG (AC/DC) | 400-800 — AHP AlphaTIG 200X, PrimeWeld TIG225X | 1200-1800 — Everlast PowerTIG 200DV | 2500+ — Miller Diversion 180 | Aluminum, stainless, all premium fabrication |
| Stick (SMAW) | 150-250 — Amico ARC-200DC | 500-600 — Lotos LTPDC2000D (3-in-1 plasma/TIG/stick combo) | 800+ — Lincoln AC225 (K1170) | Outdoor repairs, farm equipment, dirty/rusty steel |
| Multi-Process | 500-700 — YesWelder Multi-Process MIG-TIG-Stick | 900-1400 — Hobart Multi-Handler 200 | 2000+ — Miller Multimatic 235, Lincoln Power MIG 215 MPi | One machine for all processes, lifetime hobby tool |
For a beginner with no welder yet, start in the MIG 110V mid tier — the Hobart Handler 210 or equivalent. Add TIG capability after 6-12 months of MIG practice. Stick remains useful for outdoor field repairs even after you own MIG and TIG. The detailed buyer’s logic by tier is in the best MIG welder for home garage guide and best budget welder under $300.
MIG Welders: What to Look for in a Beginner Machine
A beginner MIG welder should have at least 140 amps of output, infinite voltage control, and a wire feed speed dial. 140 amps is the minimum that handles 3/16-inch mild steel in a single pass — the threshold that covers 90% of home welding projects. Machines rated below 100 amps struggle with 1/8-inch material and produce frustrating cold-lap defects.
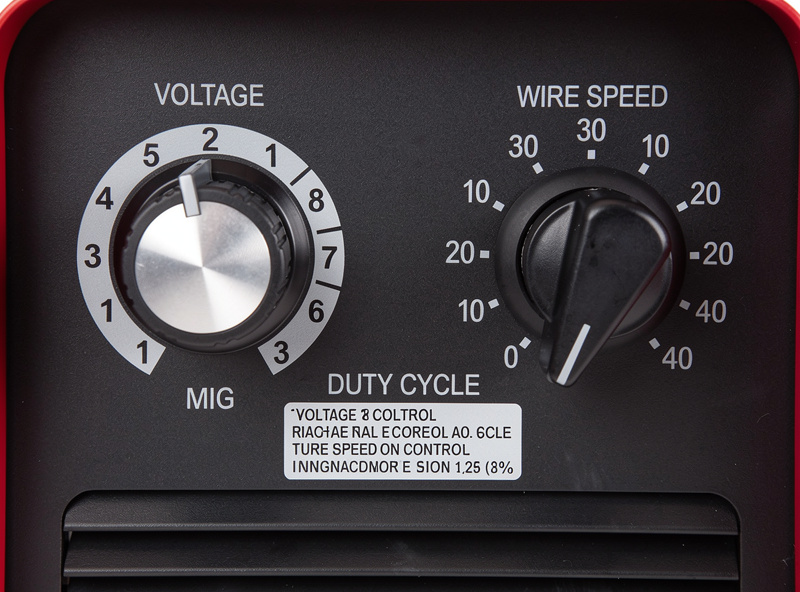
The three key specifications to compare are amperage output, duty cycle, and input voltage. Amperage determines the maximum metal thickness you can weld. Duty cycle determines how long you can weld continuously before the machine overheats and shuts down. Input voltage determines whether the machine plugs into a standard 110V outlet or requires a 220V circuit.
For home shop use, a 110V machine with 140 amp output and 30% duty cycle at 90 amps is the sweet spot. This configuration welds 3/16-inch steel in a single pass, runs on a standard garage outlet, and provides enough continuous welding time for any beginner project. At 90 amps (typical for 1/8-inch steel), a 30% duty cycle means 3 minutes of welding followed by 7 minutes of cooling — more than adequate for home projects where you stop to reposition and measure between welds.
Dual-voltage machines (110V/220V) cost $50-$100 more than 110V-only units but offer future-proofing. When you eventually need to weld 1/4-inch steel, a 220V outlet lets the same machine reach its full 140-200 amp output. Buying a dual-voltage machine now avoids replacing your welder later.
Detailed comparison: Best budget welders under $300 for home use
Auto-Darkening Helmets: Features That Matter
An auto-darkening helmet needs four features: adjustable shade range (9-13), sensitivity control, delay control, and grind mode. Shade 9-10 is sufficient for low-amperage MIG and TIG welding. Shade 11-13 is required for stick welding and high-amperage MIG. Without adjustable shade, a fixed-shade helmet may be too dark for thin work or too bright for heavy plate.

Sensitivity control adjusts how bright a light source must be before the lens darkens. Set it high for outdoor welding where sunlight might trigger the lens. Set it low for indoor welding near overhead fluorescent lights that can cause false-darkening. Delay control determines how long the lens stays dark after the arc stops — set it short (0.2-0.5 seconds) for tack welding and longer (0.5-1 second) for continuous beads.
Grind mode switches the lens to a permanent clear shade (shade 3-4) so you can grind welds without removing the helmet. Without grind mode, you must flip the helmet up to grind, then flip it back down to weld — a constant interruption that wastes time on projects with multiple grinding steps.
Viewing area size matters more than most beginners realize. A 3.6 x 1.6-inch viewing area (the standard size on budget helmets) shows only the immediate weld zone. Larger viewing areas (3.8 x 2.7 inches or 3.93 x 3.66 inches) show the surrounding workpiece, making it easier to track joint position and anticipate stops. Premium helmets with larger viewing areas cost $80-$150 vs $40-$60 for standard size.
Full breakdown: Best welding helmets for home use — auto-darkening vs fixed shade
Angle Grinders: The Welder’s Best Friend
A 4.5-inch angle grinder is the most-used accessory tool in welding. It cuts metal with a cutoff wheel, grinds welds smooth with a flap disc, removes spatter with a wire wheel, and brushes surfaces clean before welding. Every home welder needs one — it is as essential as the welder itself.
Look for a grinder with 7-11 amp motor, 8,000-11,000 RPM, and a paddle switch (not a slide switch). Paddle switches shut off when you release the grip, providing a safety interlock that prevents the grinder from running if dropped. Slide switches lock the grinder in the ON position — a safety hazard that some manufacturers have stopped using entirely.
Buy three accessories at the same time as the grinder: a metal cutoff wheel (for cutting), a 60-80 grit flap disc (for grinding welds smooth), and a knotted wire cup brush (for cleaning spatter and rust). These three accessories handle 95% of welding-related grinding tasks. Add a grinding disc (for aggressive material removal) only when you need it.
Budget $30-$60 for a quality 4.5-inch grinder from DeWalt, Makita, or Milwaukee. Avoid grinders under $20 — their bearings fail within 50 hours of use and their guards loosen during operation. A mid-range grinder lasts 500+ hours of intermittent use, which translates to 5-10 years of home welding.
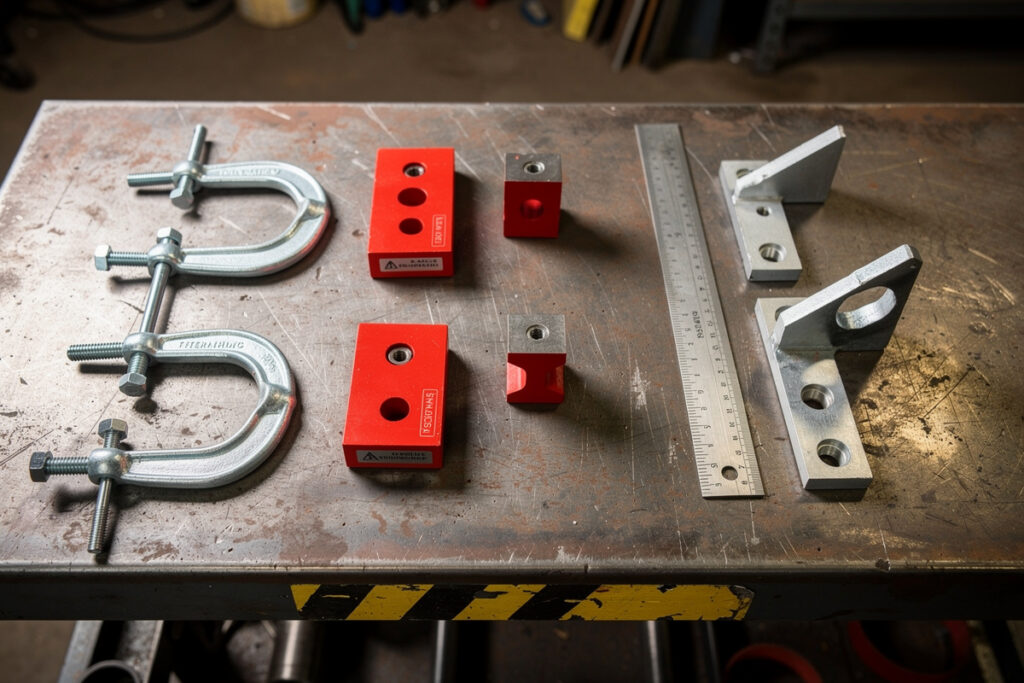
Clamps, Magnets, and Fixturing
Welding requires at least four clamps: two C-clamps for the welding table and two locking pliers (Vise-Grip style) for holding pieces at fixed angles. Welding magnets ($10-$15 for a set of three) hold pieces at 45 and 90-degree angles and are the fastest way to set up simple joints.
C-clamps attach workpieces to the welding table or a steel plate on sawhorses. Buy 2-inch and 4-inch C-clamps — these two sizes cover 90% of beginner clamping needs. Spring clamps ($2-$5 each) hold thin sheet metal where C-clamps would crush the material.
Locking pliers hold two pieces together at a specific angle while you tack weld them. After tacking in two or three spots, remove the pliers and complete the weld. Welding magnets serve the same purpose for 45 and 90-degree joints but release immediately when you pull them away — locking pliers require squeezing the release lever, which can disturb a fragile tack weld.
For repeatable projects (building multiple identical pieces), a welding fixture or jig holds parts in exactly the same position every time. You can build your own fixtures from scrap steel and clamps — there is no need to buy commercial fixtures for home welding. A fixture that holds two pieces of angle iron at 90 degrees, for example, speeds up bracket production by 50% compared to measuring and clamping each piece individually.
Welding Tables and Work Surfaces
A welding table provides a flat, grounded surface for clamping workpieces and completing welds. Commercial welding tables cost $150-$500 and feature machined flat tops, built-in ground connections, and T-slot or hole-pattern clamping systems. For beginner welding, a steel plate on sawhorses or a repurposed steel desk works as well as a commercial table.
The minimum viable welding surface is a piece of 3/8-inch steel plate at least 24 x 24 inches. The plate provides a flat reference surface for clamping and acts as a ground plane that catches sparks and spatter. Place it on a sturdy workbench or sawhorses at a comfortable standing height (34-38 inches for most adults).
If buying a welding table, prioritize three features: top flatness (within 1/16 inch across the surface), built-in ground clamp or stud, and at least 300-pound weight capacity. Tables with built-in clamp slots or hole patterns speed up setup time but are not required for beginner projects.
Build your own: How to build a welding cart that doubles as a work surface
Consumables and Ongoing Costs
Monthly consumable costs for a MIG welder running 4-8 hours per week are $30-$60. This covers 2-3 pounds of wire ($8-$15), 2-4 contact tips ($1-$4), occasional nozzle replacement ($3-$5), and gas cylinder refills every 3-4 months ($25-$40 per refill).
ER70S-6 is the standard solid wire for mild steel MIG welding. A 10-pound spool costs $25-$40 and produces roughly 40-60 hours of welding. At beginner practice volumes (4-8 hours per week), one spool lasts 5-12 months. Buy 0.030-inch diameter wire — it is the most versatile size for 110V machines working on 16-gauge to 3/16-inch steel.
Contact tips wear out fastest, but not as fast as most beginners expect: a tip is rated for roughly 100 pounds of wire fed before bore erosion causes erratic feeding, though most home tips get retired earlier from a bent tip after a bump, spatter clogging the bore, or a wire-diameter change (source). Buy tips in packs of 10 or 25 — they cost $0.50-$1.00 each in bulk. Match the tip size to your wire diameter: 0.030 tips for 0.030 wire, 0.035 tips for 0.035 wire.
Shielding gas (75% argon / 25% CO2, known as C25) is the ongoing cost that surprises most beginners. A 80-cubic-foot cylinder costs $120-$180 for the first fill (including the cylinder deposit) and $25-$40 for each subsequent refill. At 15-25 CFH gas flow rate and 4-8 hours of weekly welding, a full cylinder lasts 3-5 months. The complete consumables and cost breakdown is in the welding consumables guide.
Welding Carts: Organizing Your Equipment
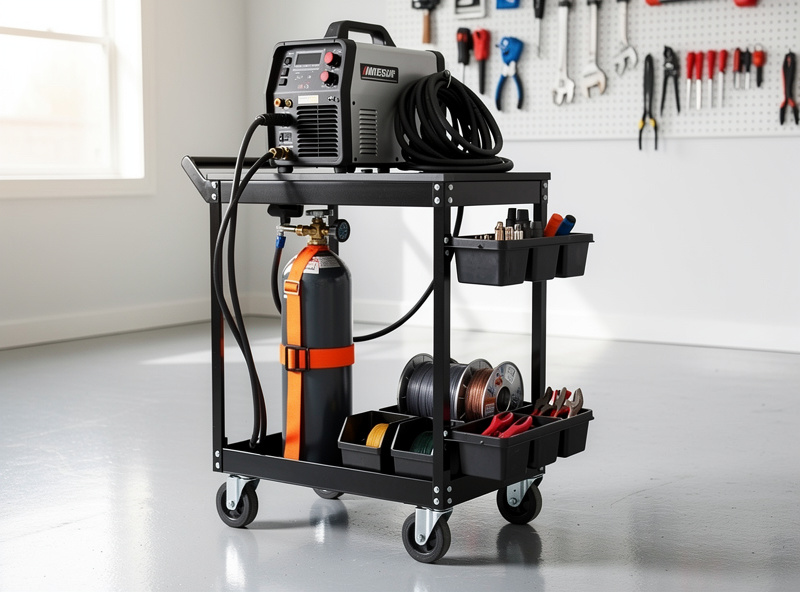
A welding cart holds your welder, gas cylinder, consumables, and hand tools in one mobile unit that rolls to wherever you are working. A dedicated cart saves 10-15 minutes per welding session compared to carrying equipment from a shelf to the work area and back. For a beginner welding twice per week, that is 2-3 hours per month of saved setup and teardown time.
Commercial welding carts cost $50-$200 and include a top shelf for the welder, a lower shelf for the gas cylinder, and side hooks for cables and helmets. The most important feature is a cylinder chain or strap that secures the gas bottle upright — a falling cylinder can break its valve and become a dangerous unguided projectile.
You can build your own welding cart from steel angle iron and flat bar as one of your first welding projects. A basic cart requires only T-joints and lap joints, making it ideal for practicing the same joint types you will use in more complex projects. Budget 6-8 hours of build time and $30-$50 in materials.
Position your cart within arm’s reach of your welding table so you can adjust voltage and wire speed without walking away from the workpiece. Mount your ground clamp on the cart near the welder — this is where most beginners lose their ground clamp and waste time searching for it between projects.
Step-by-step plans: How to build a welding cart with cut list and weld guide
TIG Welding Equipment Differences
TIG welding requires additional equipment beyond the basic MIG setup: a TIG torch with gas valve, a foot pedal amperage control, a gas lens kit, and tungsten electrodes. A TIG-capable machine costs $400-$800 for a 110V AC/DC unit that welds both steel and aluminum.
The foot pedal controls amperage in real time — press harder for more heat, release for less. This variable heat control is what makes TIG welding capable of precision work on thin materials and delicate joints. MIG welding has no equivalent — the voltage is set before the arc starts and cannot be adjusted mid-weld.
Tungsten electrodes come in different compositions indicated by color coding: 2% ceriated (grey) for DC steel welding, 2% lanthanated (blue) for AC aluminum welding, and 2% thoriated (red) for both DC and AC. Beginners should start with 2% lanthanated (blue) tungsten because it performs well on both steel and aluminum and contains no radioactive material.
TIG welding gloves are thinner and more form-fitting than MIG gloves because TIG requires precise finger control for feeding the filler rod. Never use MIG gloves for TIG — the thick leather reduces finger dexterity and makes consistent filler rod feeding nearly impossible. Budget $20-$40 for a pair of TIG-specific gloves.
Tungsten preparation: How to sharpen tungsten for TIG welding — angle, method, and tips
Reference: Tungsten electrode color chart — which tungsten for each metal
Stick Welding Equipment: Minimal and Portable
Stick welding requires the least equipment of any arc welding process: a stick welder, electrodes, a helmet, gloves, and a chipping hammer. No gas cylinder, no wire feed mechanism, no external shielding gas. This simplicity makes stick welding the most portable and affordable process for outdoor and field repairs.
A basic 110V stick welder costs $100-$250 and weighs 10-20 pounds — small enough to carry to a job site in one hand. The electrodes are self-shielding (the flux coating produces its own shielding gas), so wind does not affect the weld quality. For farm equipment repair, fence building, or any outdoor welding, stick is often the only practical process.
The main consumable is electrodes, sold in 1-pound and 5-pound cans. E6013 is the most beginner-friendly electrode — it runs on AC or DC, produces a stable arc, and creates a smooth bead with minimal spatter. E7018 is the structural-grade electrode used for code-quality work but requires an oven to store at 250-300°F to prevent moisture absorption. Beginners should start with E6013 and graduate to E7018 after developing consistent arc control.
Measuring and Layout Tools for Welding
Accurate measuring and layout tools prevent the most common beginner problem: welded assemblies that do not fit together. Five tools handle 95% of welding measurement tasks: a steel tape measure, combination square, soapstone marker, center punch, and scribe.
A 16-foot steel tape measure is the primary measuring tool for welding projects. Steel tapes resist heat damage from nearby welds — plastic tapes melt if sparks land on them. The hook end of a steel tape also serves as a scribe for marking lines on flat steel by running the hook edge along the workpiece.
A combination square ($10-$15) checks 90-degree angles and marks parallel lines at a set distance from an edge. For welding, the square’s primary use is verifying that two pieces are perpendicular before tacking. Even a 1-degree error in a 90-degree joint compounds across multiple assemblies — four slightly-off corners on a rectangular frame can produce a visible twist.
Soapstone markers ($2-$4) draw cut lines on metal that survive welding heat without burning off. Pencil, pen, and marker lines burn away immediately when an arc passes nearby. Soapstone lines remain visible through welding and grinding, making them the standard marking tool in every welding shop.
A center punch creates a small dimple in steel that guides drill bit starts and marks cut line endpoints. Without a center punch mark, drill bits walk across smooth steel and cut lines lose their endpoints after the first grinding pass. A spring-loaded center punch ($5-$10) requires no hammer — press down and it fires automatically.
Personal Protective Equipment Beyond the Basics
Beyond the helmet and gloves, welders need a flame-resistant jacket or shirt, leather boots (not synthetic), ear protection when grinding, and a respirator when welding galvanized or stainless steel. These items protect against the secondary hazards of welding: UV radiation on exposed skin, hot metal falling into boots, grinding noise, and toxic fume inhalation.
A flame-resistant cotton welding jacket ($25-$50) covers the arms and torso from spatter and UV radiation. Leather welding jackets offer better protection but are heavier and hotter — suitable for heavy MIG and stick welding in cool environments, but uncomfortable in warm garages. For summer welding, a flame-resistant long-sleeve shirt ($15-$25) provides adequate protection for light MIG work.
Leather boots protect feet from falling hot metal and sparks. Synthetic athletic shoes can melt and fuse to skin from a single spatter glob. Any leather work boot with a closed toe is sufficient — steel toes are not required for home welding but offer additional protection when handling heavy steel stock.
Grinding generates noise levels of 95-110 dB — above the 85 dB threshold for hearing damage with prolonged exposure. Foam earplugs ($0.50/pair) or over-ear muffs ($10-$20) reduce grinding noise to safe levels. Wear ear protection whenever the angle grinder is running, even for quick cleanup passes.
A half-face respirator with P100 filters ($25-$40) is required when welding galvanized steel, stainless steel, or any coated metal. The fumes from these materials contain hexavalent chromium (NIOSH lists Cr(VI) as a confirmed human carcinogen), zinc oxide, or other compounds that cause metal fume fever and long-term respiratory damage. OSHA 29 CFR 1910.252(c) mandates local exhaust whenever fume cannot be avoided (source). For mild steel welding in a ventilated garage, a respirator is not strictly required but recommended for extended welding sessions. The full safety and PPE breakdown is in the welding safety guide; the helmet selection is in best welding helmet for home use; ventilation specifics in welding ventilation home garage; and the welding table selection in the welding table buying guide.
The Equipment Decision That Matters Most
If you only get one piece right, get the welder right — and the way to get it right is to size for your second project, not your first. My first welder was undersized for the trailer-fender repair I bought it for; I returned it and bought a 140-amp dual-voltage unit that ran every project for the next three years. Helmets, gloves, grinders, clamps — all replaceable as you go. The welder is the one piece you commit to for years, and the cost of buying the wrong one twice is more than the cost of buying the right one once. Pick the column on the comparison table that matches what you will actually weld in year two, not just year one.
Frequently Asked Questions
What welding equipment does a beginner need?
A 110V MIG welder ($200-$350), auto-darkening helmet ($40-$100), leather MIG gloves ($15-$30), 4.5-inch angle grinder ($30-$60), clamps and magnets ($20-$40), and consumables ($30-$60). Total startup cost: $400-$800.
How much does a good MIG welder cost?
A reliable 110V MIG welder with 140 amp output costs $200-$350. Dual-voltage (110V/220V) machines cost $250-$450. Avoid welders under $150 — their wire feed mechanisms jam and duty cycle ratings are unreliable.
Do I need a welding table to start?
No. A 3/8-inch steel plate on sawhorses works for flat-position practice and beginner projects. Invest in a proper welding table ($150-$500) after you are building projects that require out-of-position welds.
How much are welding consumables per month?
Monthly consumable costs for 4-8 hours of weekly MIG welding are $30-$60: wire ($8-$15), contact tips ($1-$4), nozzles ($3-$5 occasional), and gas refills ($25-$40 every 3-4 months).
What size angle grinder do I need for welding?
A 4.5-inch angle grinder with 7-11 amp motor is the standard size for welding work. It handles cutoff wheels, flap discs, and wire brushes — the three accessories that cover 95% of welding grinding tasks.
Related Articles
- MIG vs Multi-Process Welders — When paying more saves money
- Welding Extension Cords Guide — Wire gauge, length, and voltage drop
- Chop Saw vs Band Saw vs Angle Grinder — Which metal cut-off tool to buy
- Welding Clamps, Magnets, and Squares — Fixturing tools for every project
- Welding Gloves and Jacket Guide — Leather vs FR cotton for every process
- Welding Gas Guide — Argon, CO2, helium, and tri-mix
- Angle Grinder Guide for Welders — Cutoff wheels, flap discs, and wire brushes
- Best Budget Welder Under $300
- Best Welding Helmet for Home Use
- Cost to Start Welding at Home in 2026
- How to Build a Welding Cart
- Welding for Beginners: Complete Guide
- Best MIG Welder for Home Garage
- Welding Consumables Guide
- Welding Table Buying Guide
- Welding Safety Guide
- Welding Ventilation for Home Garage
- MIG Welding Complete Guide
- TIG Welding Guide
- How to Sharpen Tungsten for TIG
- Tungsten Electrode Color Chart
- Welding Troubleshooting Guide
- DIY Welding Projects Guide
Discussion (0)