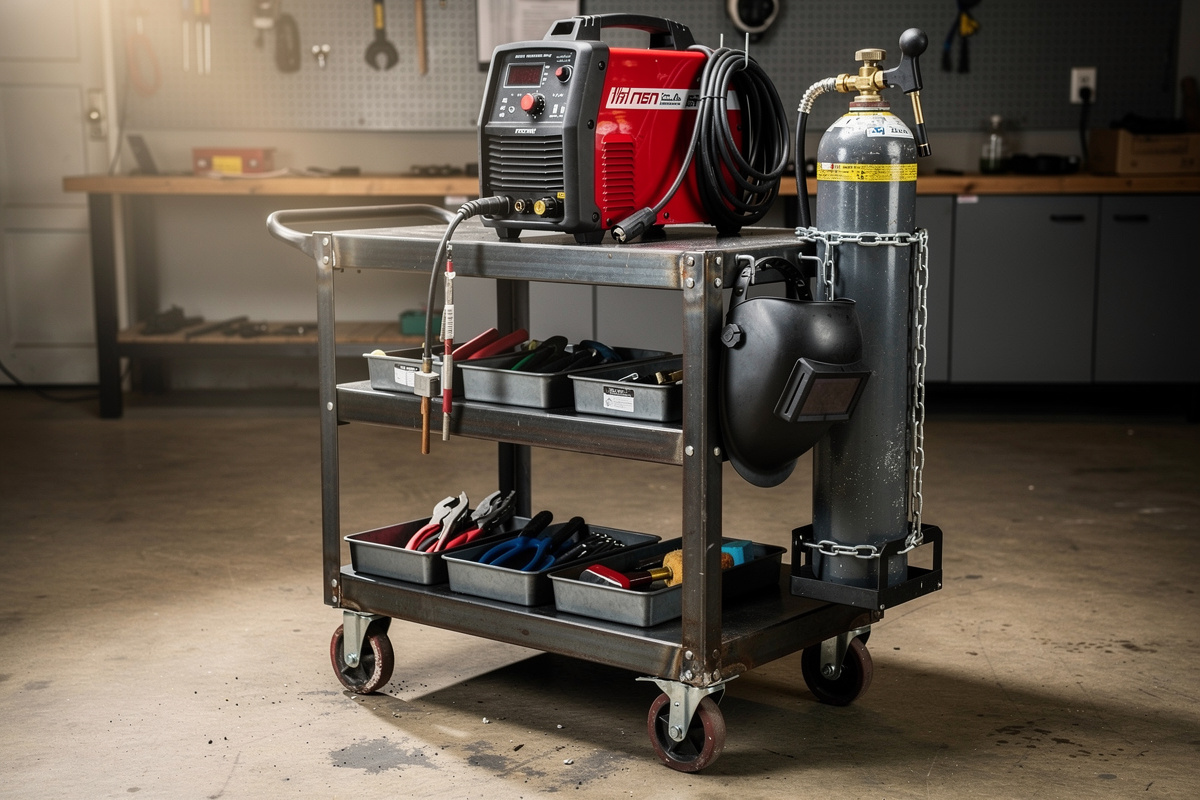
Build a welding cart from 1-inch square steel tubing in a 24×18-inch footprint, 32 inches tall, with three shelves, four caster wheels (two locking), and a chain bracket for the gas cylinder. Total material cost is $80-$130, build time 4-6 hours including paint.
I built my welding cart in year two using $90 of 1″ square tube and 3/16″ plate from the local supplier. The first version wobbled on flat ground because I rushed the squaring step on the bottom frame; the rebuild taught me to verify a 3-4-5 triangle at every tack stage before a single full weld. The cart has carried my Hobart, an 80-cuft argon cylinder, and a tray of consumables for five years now without a single bracket failure. The full project ladder is in the DIY welding projects guide.
A welding cart is the fourth or fifth project most home welders attempt because it teaches every fundamental skill in one weekend — square cutting, tack welding, fillet welds at outside corners, fillet welds at inside corners, painting, and hardware fitting. The finished product earns its keep daily for the next 10-15 years.
As an Amazon Associate I earn from qualifying purchases.
Welding Cart Specifications and Why They Matter
The standard hobbyist welding cart footprint is 24 inches deep by 18 inches wide by 32 inches tall, with three horizontal shelves at 4, 14, and 24 inches off the floor. This holds the gas cylinder upright on the bottom shelf, a small welder centered on the middle shelf, and tools or the helmet on the top shelf. Four 4-inch swivel casters with at least two locking add 4 inches of total height, putting the top shelf at a comfortable 28-inch working height.
Why each dimension matters:
- 24×18-inch footprint: Wide enough to support a standard hobbyist 200-pound MIG welder without tipping; small enough to wheel through a 36-inch garage door opening with margin.
- 32-inch tall frame: Top shelf at 28 inches with casters lands at standing-elbow height for most adults — useful for inspecting welds without bending.
- 4-inch bottom shelf clearance: Enough room for the gas cylinder valve assembly to clear obstacles when wheeling over uneven garage floors.
- Three shelves at 4, 14, and 24 inches: Gas cylinder on bottom (low center of gravity), welder middle (waist-height plug-in access), helmet and tools top (eye-level).
- 4-inch caster wheels: Roll over 1/2-inch garage floor cracks and small debris without binding. 2-inch casters fail this test.
- Two locking casters: Diagonal corners locked is sufficient to hold the cart still during welding. Four locking is overkill but inexpensive.
Modify the dimensions for your equipment and space, but keep the proportions. Carts under 16 inches wide tip with full cylinder loads; carts taller than 36 inches make the welder controls hard to reach without bending. Read about welder dimension considerations in our best budget welder under 300 dollars guide.
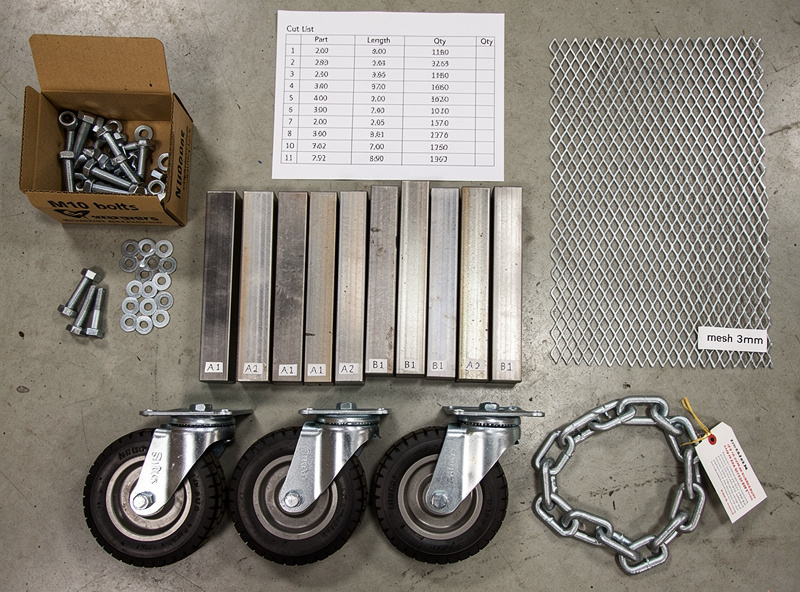
Materials List and Cut List
The full materials list runs 80-130 dollars total: 25 feet of 1-inch square steel tubing (35-45 dollars), expanded metal sheet for shelves or 1/8-inch steel plate (25-40 dollars), four 4-inch swivel casters with two locking (25-35 dollars), a 24-inch length of 3/16-inch chain plus quick links (8-12 dollars), and 1/4-20 hex bolts for caster mounting (5-8 dollars). Plus consumables: MIG wire, gas, primer, and paint.
Complete cut list from a 25-foot length of 1-inch square 14-gauge tubing:
- 4 vertical posts: 32 inches each (128 inches total).
- 4 long horizontal rails: 22 inches each (88 inches total). 22 inches accounts for the 1-inch tubing wall thickness on each end of a 24-inch frame.
- 4 short horizontal rails: 16 inches each (64 inches total). Same logic for an 18-inch wide frame.
- 2 internal cross-braces (optional but recommended): 16 inches each (32 inches total).
- Total tubing used: 312 inches = 26 feet. Buy 30 feet to allow for cutting losses and mistakes.
For shelves, expanded metal sheet provides ventilation around the welder and lets gas leaks fall through rather than pool. 1/8-inch steel plate is sturdier but heavier and more expensive. For the gas cylinder restraint, a 24-inch length of 3/16-inch proof-coil chain with two snap-link clips meets safety requirements at any local fire code. Skip lighter chain — a tipped cylinder snaps weak chain links.
Step-by-Step Build Procedure
The build sequence: cut all tubing, square-up two long-rail-plus-short-rail rectangles for the bottom and middle frames, tack-weld the rectangles, tack-weld vertical posts to one rectangle then the other, fully weld all joints, attach shelves, mount casters, install chain bracket, prime and paint. Total active time is 4-6 hours; with paint dry time, plan a full weekend.
Full build steps:
- Cut all tubing. Use a chop saw or angle grinder with cutoff wheel. Square cuts within 1/16 inch matter — out-of-square cuts leave gaps that need filler.
- Lay out the bottom frame on a flat surface. Two long rails plus two short rails forming a 24×18 rectangle. Square with a framing square; the diagonal measurements should match within 1/8 inch.
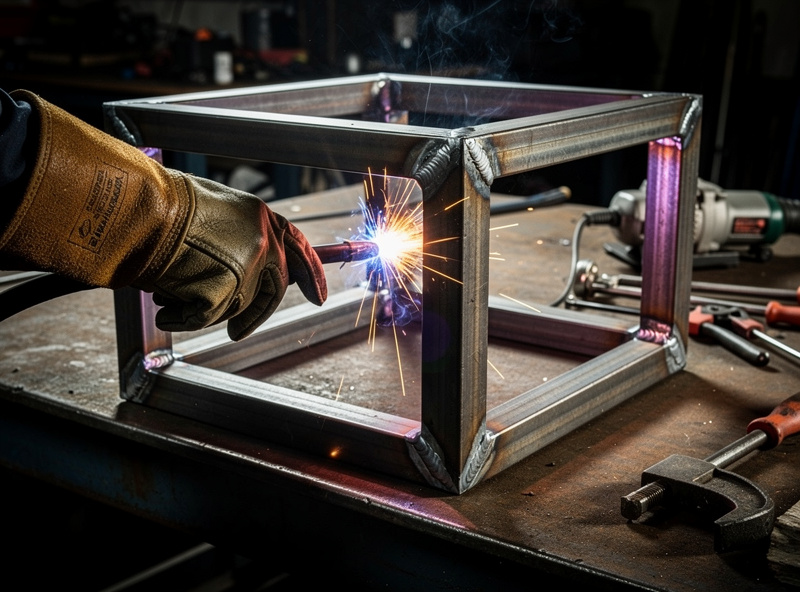
- Tack-weld the four corners of the bottom frame. Three tacks per corner, one inside, one outside, one on the back side. Re-check square after tacking.
- Repeat for the middle frame only. Two identical 24×18 rectangles total (bottom and middle) — matches the cut list above. The top shelf at 24 inches doesn’t get its own welded rectangle; it’s expanded metal tacked to small corner tabs welded onto the posts at that height, which saves the extra frame’s worth of tubing (the posts keep running another 8 inches above it to the full 32-inch height) and still holds tools and a helmet fine.
- Stand up two vertical posts and tack to one corner of the bottom frame. Use a level to confirm vertical.
- Position the second pair of posts and tack the bottom frame on the other end. Now you have a 4-poster bottom assembly.
- Slide the middle frame onto the posts at the 14-inch mark and tack it in place. Then mark the 24-inch height on all four posts and tack a small corner support tab at each mark for the top shelf.
- Re-check overall square and level. Adjust before fully welding any joint. Tacks are easy to break and reposition; full welds are not.
- Run finish welds on every joint. Inside fillet welds where shelves meet posts, outside corner welds at frame intersections.
- Attach shelves. Tack expanded metal or 1/8 plate to the inside of the rails on the bottom and middle frames; tack the top shelf onto the corner tabs at the 24-inch mark.
- Drill caster mounting holes and mount casters. 1/4-20 bolts with locking washers.
- Weld a small tab at one corner for the gas cylinder chain. Position high enough that the chain pulls horizontally across the cylinder, not vertically.
- Grind smooth, prime, paint. Cold-rolled black tubing rusts within months of bare exposure; primer plus enamel paint adds a decade of life.
The most common newbie mistake is rushing the squaring step and ending up with a cart that wobbles on flat ground. Take the extra 10 minutes to verify square at each tack stage. Fix it before any full welds happen. For specific MIG technique, see our MIG welding settings chart.
Gas Cylinder Restraint and Safety Details
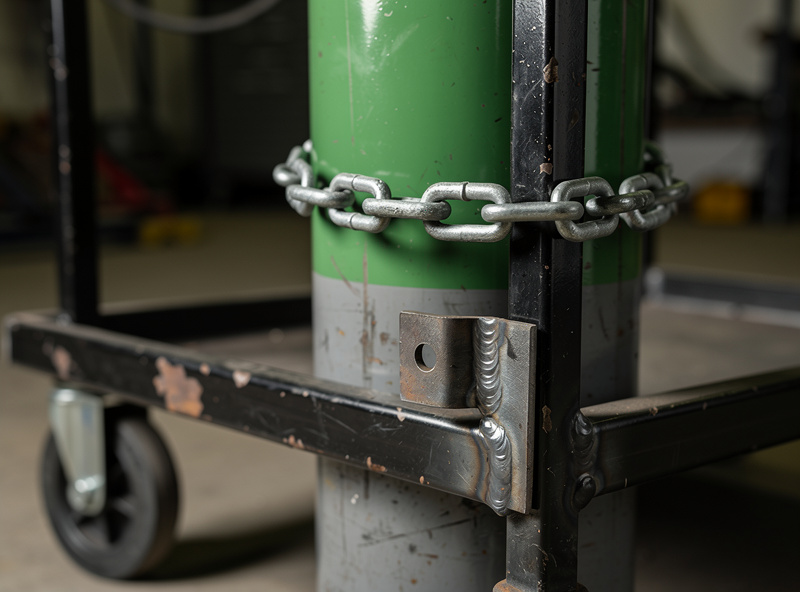
OSHA and local fire codes require gas cylinders to be physically restrained against tipping. The standard solution on a welding cart is a 3/16-inch chain anchored to a weldment tab on the cart frame, looped around the cylinder body, and secured with a snap-link clip. The chain should restrain the cylinder from tipping but allow it to be lifted out vertically for refilling.
Cylinder restraint best practices:
- 3/16-inch proof-coil chain or stronger. Lighter chain breaks when the cylinder tips with full weight behind it.
- Anchor at horizontal level. The chain pulls across the cylinder, not lifts it. Vertical anchors strain the bottom shelf.
- Loop the chain twice around the cylinder. Single-wrap chains slide off if the cylinder rocks.
- Use a snap-link clip, not a hook. Hooks unhook accidentally; snap-links require deliberate action to release.
- Position the chain on the upper third of the cylinder. Higher anchor point means greater leverage to prevent tipping.
- Test the restraint manually. Push the top of the cylinder firmly with the chain locked — it should resist movement of more than an inch in any direction.
For cylinders larger than the common 80-cuft size, step up to a wider 1/4-inch chain. An 80-cuft steel argon or argon/CO2 cylinder itself is lighter than most people expect — 47 pounds tare (empty) weight, around 55-60 pounds full (verified spec) — but that weight sits high and off-center on a narrow base, so the leverage of a tipping cylinder still snaps an undersized chain link even at that weight; don’t assume “it’s not that heavy” means restraint doesn’t matter. OSHA’s compressed-gas standard requires cylinders be secured so they cannot drop or strike another object (OSHA interpretation letter) — a chain-and-cart setup like this one satisfies that. Read our complete welding-safety reference in welding burns first aid.
Common Build Mistakes and Fixes
Five mistakes show up in nearly every first-cart build: out-of-square frames that wobble, casters mounted directly to thin tubing without backing plates, paint applied over slag and mill scale, gas cylinder anchor too low on the frame, and shelves mounted on top of rails instead of inside the frame. Each is easy to avoid with one extra check.
Specific mistakes and their fixes:
- Wobbly cart on flat floor: Frame went out of square during welding. Heat distortion from full welds without enough tacking pulls joints. Fix: more tacks (4-6 per joint), full welds in alternating cross pattern not in sequence around one joint.
- Casters tearing out of thin tubing: Mount casters with 1/8-inch steel plate as backing, NOT directly into 1-inch square 14-gauge tubing. Bolt through both layers.
- Paint flaking off in months: Skipping the primer step or painting over slag/spatter. Wire-wheel all welds, wipe with mineral spirits, then primer, then enamel.
- Cylinder chain at wrong height: Anchor at 60-70% of cylinder height. Lower anchors fail under leverage; higher anchors interfere with the cylinder valve.
- Shelves on top of rails: Increases overall cart height and creates lip that catches things. Tack expanded metal INSIDE the frame, flush with the top of the rails.
- Forgetting the cylinder access notch: Cut a half-circle notch in the bottom shelf so the cylinder bottom drops in cleanly. Without notch, the cylinder sits 1-2 inches above the shelf and rocks.
- Skipping the cable management hooks: Weld a couple of small hooks for MIG ground cable and welder torch cable. Otherwise cables drag on the floor and the cart looks cluttered.
The square-frame issue is the single most common one, and it shows up after final painting when you wheel the cart and notice the wobble. Fix the squaring habit early — every tack stage gets squared, every full-weld stage gets re-squared. For broader project planning, read our piece on DIY welding fire pit build guide.
Frequently Asked Questions
What size steel tubing should I use for a welding cart?
1-inch square 14-gauge steel tubing is the home-shop standard. It welds easily with hobbyist MIG settings, holds 250-pound loads with margin, and bends if dropped rather than cracking. Heavier 1.5-inch or 11-gauge tubing adds rigidity but makes the cart heavier than necessary for hobby use.
Do I need a chain to secure the gas cylinder to my welding cart?
Yes. OSHA and most local fire codes require physical restraint of compressed gas cylinders. A tipped 80-cubic-foot cylinder snapping its valve assembly off becomes an uncontrolled rocket. The chain costs 10 dollars and prevents this fundamental safety hazard.
Can I build a welding cart with flux-core wire instead of gas-shielded MIG?
Yes. Flux-core wire welds 1-inch square tubing fine and produces structurally sound carts. Expect more spatter and slag cleanup compared to gas-shielded MIG. The finished cart will be every bit as strong; only cosmetics differ.
How long does it take to build a welding cart?
Active build time is 4-6 hours: 30 minutes cutting, 90 minutes tacking and squaring frames, 90 minutes finish welding, 60 minutes shelves and casters, 60 minutes paint prep. With paint drying time over 24 hours, plan a full weekend.
Do I need to paint a welding cart?
Yes if it lives in a garage with any humidity. Bare cold-rolled steel rusts within months. Primer plus single-coat enamel adds 10-plus years to cart life and looks better than rust patina. Powder coating is overkill for hobby use.
What load capacity should a welding cart support?
For hobby use, 250 pounds total load (welder plus gas cylinder plus tools) is the realistic target. The cart described in this guide handles that with margin. Heavier industrial-grade carts targeting 500-plus pounds use 11-gauge or 1.5-inch tubing and add 30 dollars in materials.
Related Articles
- MIG vs Multi-Process Welders — When paying more saves money
- Welding Extension Cords Guide — Wire gauge, length, and voltage drop
- Chop Saw vs Band Saw vs Angle Grinder — Which metal cut-off tool to buy
- Welding Clamps, Magnets, and Squares — Fixturing tools for every project
- Welding Gloves and Jacket Guide — Leather vs FR cotton for every process
- Welding Gas Guide — Argon, CO2, helium, and tri-mix
- Angle Grinder Guide for Welders — Cutoff wheels, flap discs, and wire brushes
- DIY Welding Projects Guide
- DIY Welding Fire Pit Build Guide
- Welded Steel Raised Bed Frames
- Welding a Steel-Tube Sim Rig Frame
- MIG Welding Settings Chart
- Welding Burns First Aid
- Best Budget Welder Under $300
- How to Identify Mystery Steel
- Welding Table Buying Guide
- Welding Safety Guide
Discussion (0)