The 10 best first welding projects teach one core skill each — T-joints, butt joints, frame squaring — in ascending difficulty. Skip ahead to the grill stand because it looks cooler than the cart and you’ll regret it when your out-of-square frame wobbles on three legs.
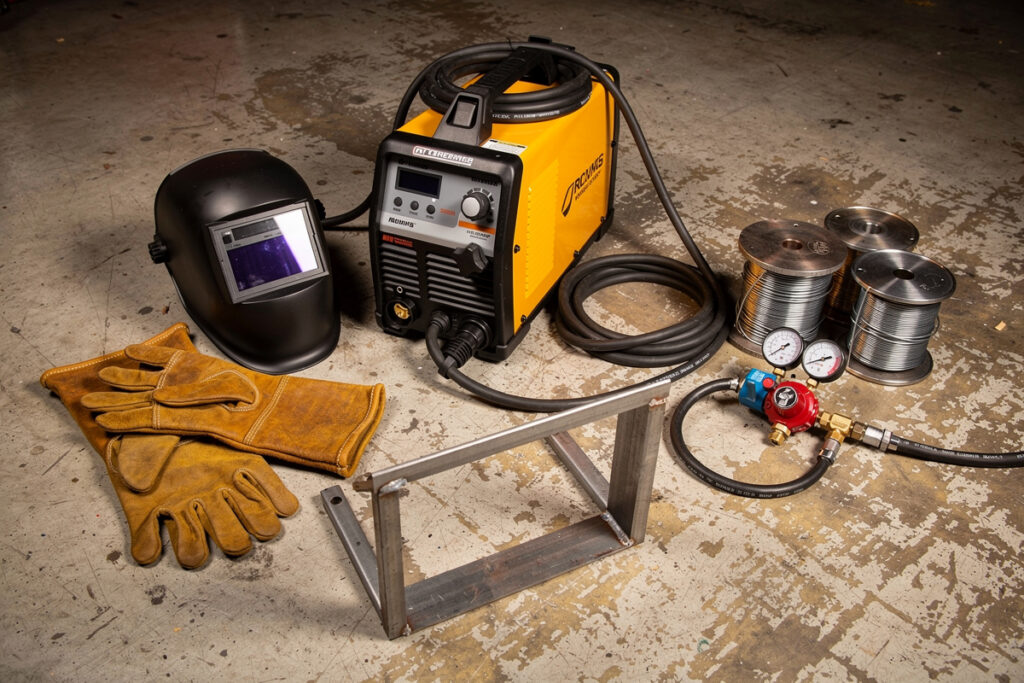
I built six of these ten in my first year of welding, and the four I skipped were the ones my friend who has been welding for decades later told me I should have started with. The welding cart (project one) taught me that fit-up matters more than welding skill. The fire pit (project two) taught me that thermal distortion is real and will twist a square frame into a potato chip if you weld it in the wrong sequence. Each project below includes the primary skill it teaches, rough material cost in 2026, and the estimated build time for a beginner. For the equipment you need to build any of these, see the essential welding equipment guide. For the workshop setup to build them in, see how to set up a home welding workshop.
1. Welding Cart — Teaches T-Joints and Fit-Up Discipline
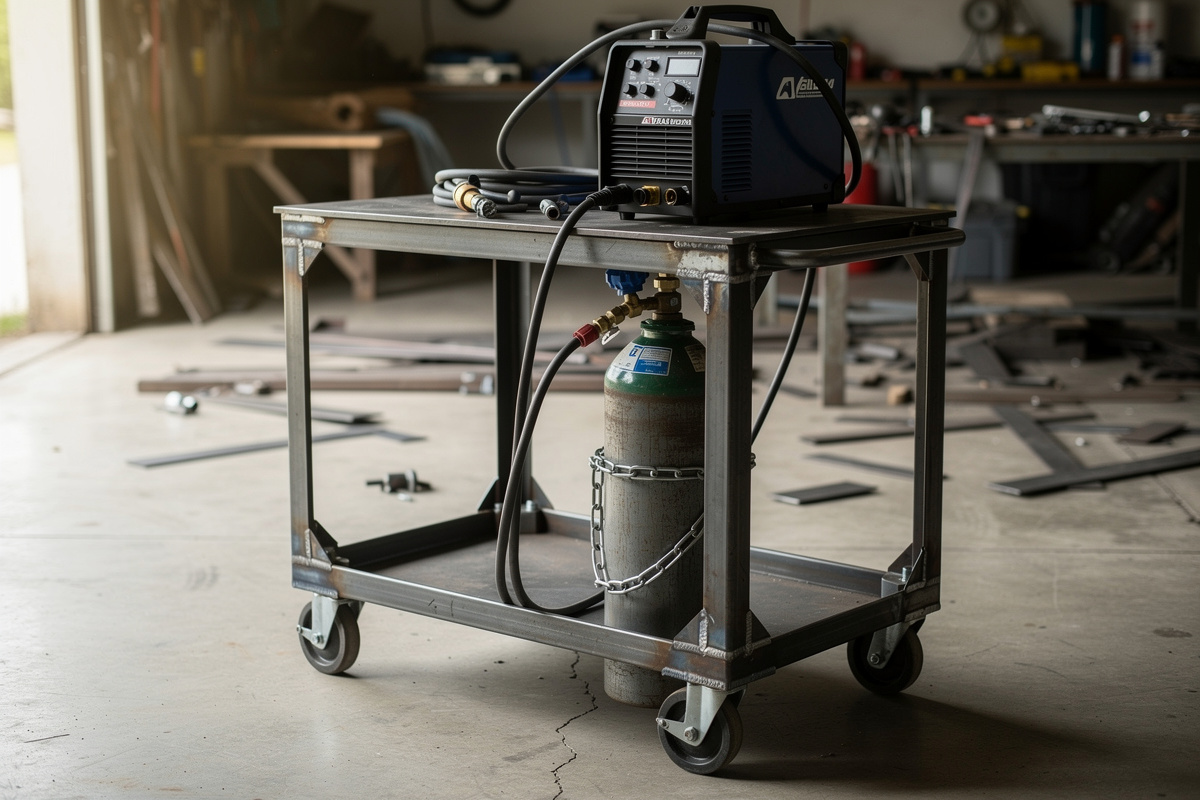
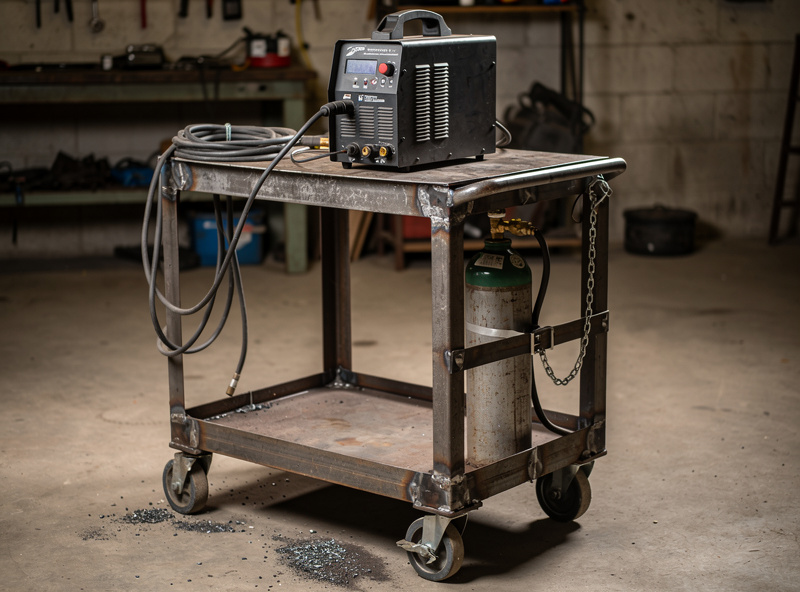
The welding cart is the canonical first project because it is all T-joints on 1/8-inch angle iron, it is small enough to fit on any welding table, and you will use it every day after you build it. Material is roughly 25 dollars of 1-inch angle iron and four 3-inch swivel casters (the Faultless 3″ rubber-tread are the ones I have on mine and they handle dragging the cart across a concrete floor without flat-spotting). I welded mine with 0.030 Lincoln SuperArc L-56 ER70S-6 on my YesWelder MIG-PRO205DS — voltage on tap 4, wire speed around 250 IPM for 1/8-inch angle. The primary skill learned is T-joint consistency — every joint on a welding cart is a 90-degree corner where two pieces of angle iron meet. The secondary skill is fit-up: if the frame is not square before the first tack, it will never be square, and a cart that crabs sideways every time you push it teaches that lesson harder than any YouTube video.
Skills taught: T-joint consistency, frame squaring, tack-weld sequencing (tack opposite corners first), reading penetration on 1/8-inch angle iron.
Material cost: 25-35 dollars (angle iron + casters).
Beginner build time: 4-6 hours including cutting and fitting.
Full build guide: How to Build a Welding Cart.
2. Steel Fire Pit Ring — Teaches Thermal Distortion Management
A simple steel ring fire pit — just a 24-inch diameter ring of 1/8-inch plate, 12 inches tall — teaches the single most important lesson of multi-joint welding: weld sequence controls distortion. Weld the ring segments end-to-end in order and the ring pulls into an oval. Weld them in a skip sequence (weld joint 1, then joint 4, then joint 2, then joint 3 for a 4-segment ring) and the ring stays round. This is the project where beginners first see thermal expansion physically move steel while they are welding it — the “oh, that’s what they meant” moment. I rolled the segments for mine on a Harbor Freight 1/4-inch ring-and-pinion bender (around $200 — slow but it pays for itself after the second ring project), then tacked with 0.030 ER70S-6 at low amperage before sequencing the final fillets.
Skills taught: Butt joints on 1/8-inch plate, weld sequence planning, skip-weld technique, heat management across multiple joints.
Material cost: 40-60 dollars (1/8-inch plate segments or flat bar rolled into a ring).
Beginner build time: 3-5 hours.
Full build guide: DIY Welding Fire Pit.
3. Steel Sawhorse Brackets — Teaches Load-Bearing Weld Design
A pair of steel sawhorse brackets — the triangular brackets that hold 2×4 legs, not the full sawhorse — is the smallest project that must actually hold weight. The brackets are just two pieces of 1/8-inch flat bar welded into a T-shape at a 15-degree angle, but the weld must carry the weight of whatever sits on the sawhorse. This project introduces the concept that a beautiful weld on a poorly designed joint still fails, while an ugly weld on a properly designed joint holds forever. It also teaches welding at an angle other than 90 degrees for the first time.
Skills taught: Acute-angle joints, load-path thinking, welding on a non-90-degree angle, minimal-material design.
Material cost: 15-20 dollars (1/8-inch flat bar, 3 inches wide).
Beginner build time: 3-4 hours for a pair.
4. Angle Grinder Stand — Teaches Freehand Cutting and Hole Layout
A wall-mounted or bench-mounted stand for an angle grinder introduces two new skills: cutting multiple pieces to identical length (if one leg is 1/8 inch shorter than the others, the stand rocks), and drilling holes in steel for mounting bolts. The project is a simple rectangle frame with a cradle on top that holds the grinder, and mounting holes drilled through the back for wall attachment. The drilling teaches that a center punch and cutting oil are not optional — skipping either means a wandering drill bit and a ruined hole.
Skills taught: Cutting repeatable lengths, drilling steel, wall-mount design, welding thin-wall square tube (if using tube instead of angle iron).
Material cost: 20-30 dollars (angle iron or 1-inch square tube, bolts).
Beginner build time: 3-5 hours.
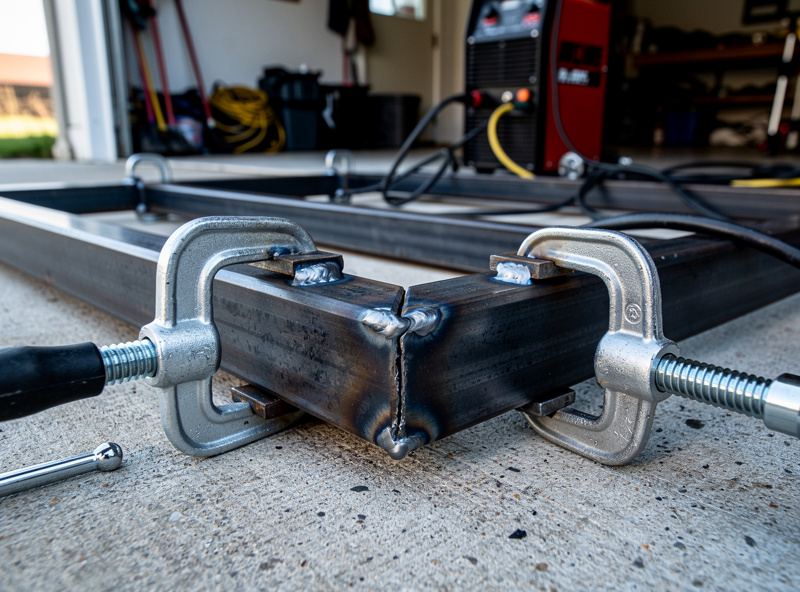
5. Workbench Leg Frame — Teaches Large-Scale Squaring
A steel leg frame for a wooden workbench top is the first project where the workpiece is larger than the welding table. The frame is four legs with cross-bracing, roughly 34 inches tall and 24 by 48 inches in footprint. The challenge is keeping a 4-foot-long assembly square when the diagonal measurement tolerance is 1/16 inch — a 1/16-inch error on a 4-foot diagonal becomes a visibly out-of-square bench. This project forces you to measure diagonals, use corner clamps, and tack-weld in sequence while checking square after every tack.
Skills taught: Large-frame squaring, diagonal measurement, corner clamping, multi-tack sequencing, welding thicker material (1/4-inch wall tube for legs).
Material cost: 40-60 dollars (1.5-inch square tube, 1/4-inch wall for legs, 1/8-inch for cross-bracing).
Beginner build time: 5-8 hours.
6. Clamp Rack — Teaches Welding Thin Material Without Burning Through
A wall-mounted rack for C-clamps and welding magnets is made from 16-gauge or 1/8-inch flat bar — thin enough that voltage and travel speed mistakes burn through immediately. This project forces you to learn thin-metal technique: lower voltage, faster travel speed, and push angle instead of pull. The rack is just a horizontal bar with vertical pegs welded on, but every peg is a burn-through risk that teaches heat discipline better than any practice plate.
Skills taught: Thin-metal (16-gauge to 1/8-inch) welding, burn-through prevention, push vs pull technique, consistent short tack welds.
Material cost: 15-20 dollars (flat bar or square tube, plus whatever you already have for mounting hardware).
Beginner build time: 2-3 hours.
7. Steel Target Stand — Teaches Portable Design and Outdoor Welding
A collapsible steel target stand for shooting practice — an A-frame of angle iron with a crossbar and two hanging hooks for steel targets — is the first project that will live outdoors and take weather. This introduces material selection for outdoor use (mild steel rusts, but it is cheap and the welds hold fine for years), and the collapsible design teaches hinge points and removable pins — the first non-welded mechanical connection in a welded project.
Skills taught: Outdoor-use design, hinge and pin connections, welding angle iron at compound (non-90-degree) angles, rust-prevention considerations.
Material cost: 30-50 dollars (angle iron, pins, chain for hanging targets).
Beginner build time: 4-6 hours.
Warning: The stand frame (mild steel angle iron, 1/8-inch is fine) never doubles as the impact-rated target face — the target plates hanging from it need hardened AR500 steel sized to the caliber: 1/4-inch AR500 for rimfire and handgun calibers, 3/8-inch AR500 for centerfire rifle up to .308. Angle every hanging target so it deflects downward, not back toward the shooter, and never substitute mild steel for the AR500 target face — mild steel spalls and can send fragments back at the shooter.
8. Firewood Rack — Teaches Repetitive Production Welding
A simple firewood rack — two end frames connected by horizontal rails — is the first project that requires welding the same joint 8-12 times in a row. Production welding teaches consistency: bead number 1 and bead number 12 should look identical, and the only way to achieve that is to lock in gun angle, travel speed, and body position and repeat without variation. The project is simple enough that the welding itself is not the challenge — the challenge is maintaining identical technique across a dozen identical joints.
Skills taught: Production consistency, repetitive joint technique, end-frame assembly, horizontal member alignment.
Material cost: 40-70 dollars (1-inch square tube or angle iron, 1/8-inch wall).
Beginner build time: 5-7 hours.
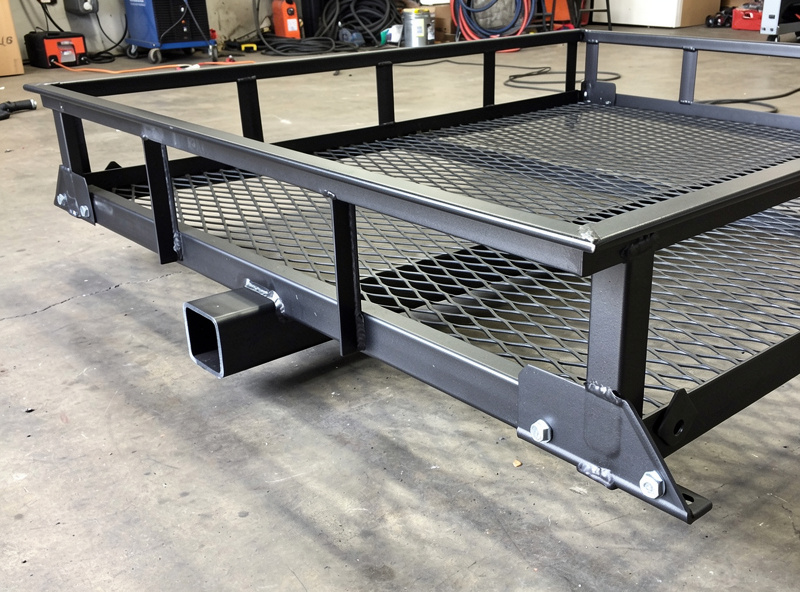
9. Trailer Hitch Cargo Carrier — Teaches Structural Welding for Real Loads
A hitch-mounted cargo carrier — the platform that slides into a 2-inch receiver and carries coolers or gear boxes — is the first project where weld failure has real consequences. The carrier sees highway-speed wind loads, vibration, and dynamic loading from bumps. This project forces you to think about weld penetration in a way a shop cart never does: a cold weld on a trailer-hitch carrier that breaks at 70 mph is not a cosmetic problem. The project also introduces welding to thick-wall tube (1/4-inch for the receiver bar) and the concept of gusset plates for corner reinforcement.
Skills taught: Structural welding mindset, thick-to-thin welding (1/4-inch receiver bar to 1/8-inch platform frame), gusset design, load-path analysis.
Material cost: 60-90 dollars (2-inch square tube for receiver bar, 1.5-inch angle iron for platform frame, expanded metal for deck).
Beginner build time: 6-10 hours.
Safety note: Test with static load before road use. This project carries legal liability if it fails on a public road. Weld every joint as if failure means the cooler behind you ends up through someone’s windshield. The structural-weld quality target for a load-bearing carrier follows AWS D1.1 (Structural Welding Code — Steel) acceptance criteria for statically loaded primary members: no undercut deeper than 1/32 inch, no surface porosity, complete fusion at the root. If you can’t see the joints clearly enough to inspect them, you can’t pass them — grind, repair, and re-weld until you can.
10. Sim Rig Frame or Desk Frame — Teaches Complex Assembly and Ergonomics
A sim racing frame or standing-desk base is the capstone first-year project. It combines everything learned in projects 1-9: T-joints from the welding cart, butt joints from the fire pit, frame squaring from the workbench, production consistency from the firewood rack, and structural thinking from the hitch carrier. The added complexity is ergonomic layout — the frame must fit the user’s body dimensions, monitor height, and pedal distance — which means the design phase (measuring, mocking up in cardboard or wood first, cutting to length) matters as much as the welding. My sim rig frame was the first welding project where I spent more time designing than welding, and the result was a frame that fit perfectly because the measurements came from my body, not a generic plan.
Skills taught: All previous skills combined, ergonomic design, custom-fit fabrication, multi-section assembly, welding overhead joints on the underside.
Material cost: 80-150 dollars (1.5-inch square tube for main frame, flat bar for mounting plates).
Beginner build time: 10-20 hours over multiple sessions.
Reference: Welding a Steel-Tube Sim Rig Frame covers the specific joint geometry and tube selection.
How to Pick Your First Project
The order above is the logical progression, but you do not have to build all ten. Build at minimum projects 1 (welding cart), 2 (fire pit), and 5 (workbench frame) — those three cover T-joints, butt joints, and frame squaring, which is 80% of home welding projects. After those three, pick whichever project matches what you actually need. A firewood rack is more motivating than a sawhorse bracket if you have a wood stove and a pile of logs staring at you.
The principle is consistent: each project should teach exactly one new skill on top of the skills you already have. A project that teaches three new skills simultaneously is a project where all three skills are learned poorly. Build narrowly, stack sequentially, and by the tenth project the welding is no longer the hardest part — the design and fit-up are, which is exactly how it should be.
For the broader picture of progressing from beginner to intermediate, see the DIY welding projects guide. For evaluating your learning pace, see how long it takes to learn welding.
Frequently Asked Questions
What is the best first welding project for a complete beginner?
A welding cart is the best first project because it consists entirely of T-joints on 1/8-inch angle iron — the most forgiving joint type on the most forgiving material. It is small, functional, and every mistake is visible and fixable. Material cost is roughly 25-35 dollars and build time is 4-6 hours.
How many projects until my welds look good?
Most beginners see a visible quality jump between project 3 and project 5. Project 1 (welding cart) produces functional but ugly welds. By project 5 (workbench frame), bead consistency and ripple pattern improve noticeably because you have practiced the same joint geometry 30-50 times across the previous projects.
Should I practice on scrap metal before starting a project?
Yes — spend 1-2 hours practicing the specific joint type your project requires on scrap of the same thickness before starting the project. If the project needs T-joints on 1/8-inch angle iron, practice T-joints on 1/8-inch scrap for an hour first. This front-loads the learning curve without the pressure of ruining project material.
Can a beginner weld a trailer hitch cargo carrier safely?
A beginner can build a hitch cargo carrier after completing 4-5 simpler projects first. The welding technique required is the same as earlier projects, but the consequences of failure are higher. Test the carrier with double the intended static load before road use, and inspect all welds for full penetration. Never put a first-welding-project carrier on a public road.
What is the cheapest first welding project material-wise?
A clamp rack or sawhorse brackets cost 15-20 dollars in steel and teach specific skills (thin-metal technique for the clamp rack, load-bearing design for the sawhorse brackets). Welding cart and fire pit ring are 25-60 dollars and teach broader foundational skills.
Do I need a welding table before starting my first project?
No — a piece of 1/4-inch steel plate clamped to a stable workbench works for the first year of small projects. A dedicated welding table becomes useful around project 5-6 when larger assemblies need full support underneath. The welding cart itself is often built on a workbench with a steel plate top.
Related Articles
- Welding for Beginners: Complete Guide
- How Long Does It Take to Learn Welding?
- DIY Welding Projects Guide
- How to Build a Welding Cart
- DIY Welding Fire Pit
- Welding a Steel-Tube Sim Rig Frame
- Essential Welding Equipment Guide
- How to Set Up a Home Welding Workshop
- Welding Safety Guide
- About Kenny Nyhus Fadil
Discussion (0)