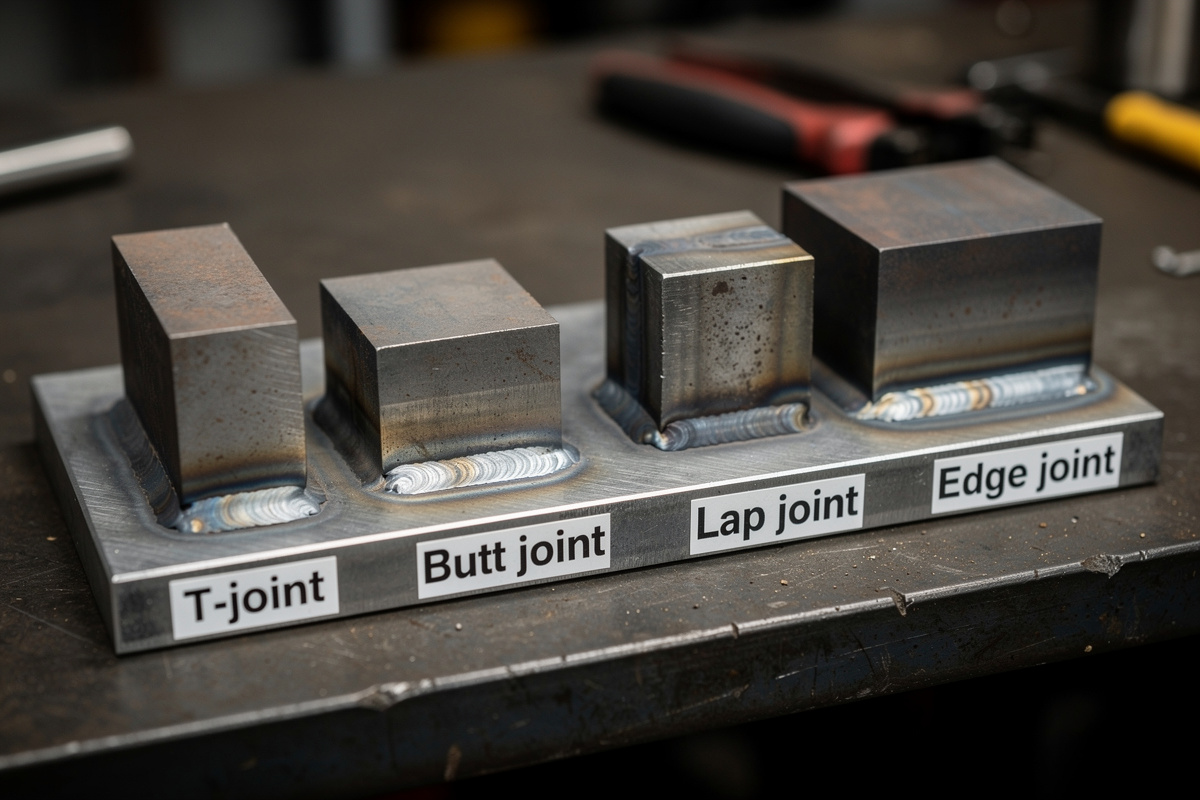

The five basic welding joints — butt, lap, T, corner, and edge — cover every connection you’ll make as a home welder. Master T-joints for frames, butt joints for plate-to-plate, and lap joints for doubler plates, and you own the vocabulary for 90% of home projects. Corner and edge joints cover the last 10%.
I learned joints in the wrong order — starting with lap joints because they looked easiest — and spent the first few weeks wondering why my projects did not fit together square. My friend who has been welding for decades corrected me: T-joints first (they are 90% of frame welding), then butt joints (harder than they look because fit-up determines penetration), then lap joints (easy but overused by beginners). The order below follows that progression. There’s one joint in here that home welders overuse on every project they build, and it’s quietly making their welds weaker — I’ll name it in section 3. For the technique behind each joint, the MIG welding complete guide covers gun angle, travel speed, and settings. Acceptance criteria for structural joints follow AWS D1.1 (Structural Welding Code — Steel) visual-inspection tables, and the filler-metal spec is AWS A5.18/A5.18M for solid wire on mild steel.
T-Joint (Fillet Weld) — The Workhorse of Frame Welding
The T-joint is formed when the edge or end of one piece of metal meets the flat face of another at a 90-degree angle, shaped like the letter T in cross-section. It is the most common joint in home welding because every frame, bracket, table leg, and cart consists of T-joints — vertical members meeting horizontal members at right angles. The weld itself is a fillet weld — a triangular bead deposited in the inside corner where the two pieces meet.
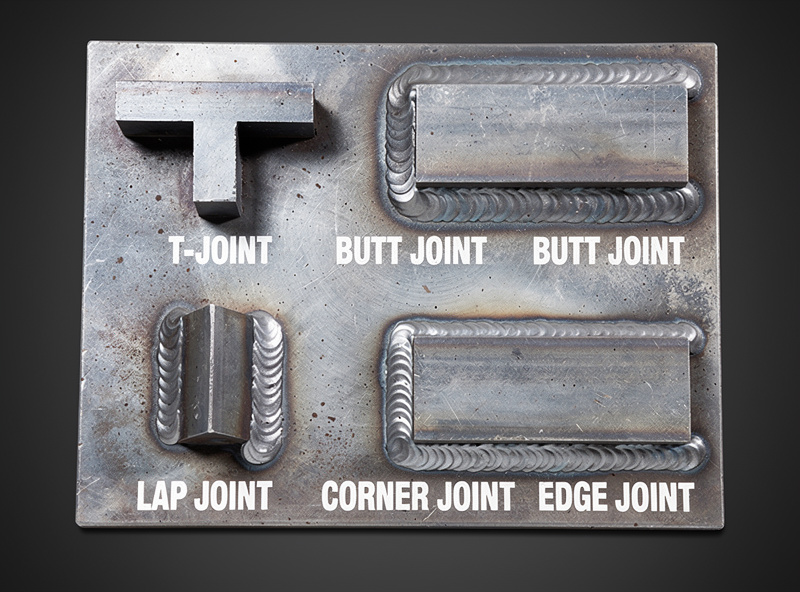
When to use it: Any time a vertical member meets a horizontal member — frame legs to crossbars, bracket ribs to base plates, shelf supports to wall plates. T-joints handle loading in compression (pushing down), tension (pulling up), and shear (sliding sideways) depending on which side of the joint carries the load.
Gun angle: 45 degrees to both faces of the joint — splitting the angle equally between the horizontal and vertical pieces. A work angle that favors either the horizontal or vertical leg directs more heat into that piece, producing uneven penetration and undercut on the cooler side.
Common beginner issues: Three problems dominate T-joint welding: (1) work angle tilted toward the flat plate instead of splitting the angle, causing the vertical leg to get less penetration and show undercut at the top toe. (2) Travel speed too fast on thin vertical legs, burning through the top edge while the bottom of the bead looks fine. (3) Forgetting that a T-joint with a gap between the pieces — common when the vertical piece is not cut square — needs a slower travel speed and slight weave to bridge the gap.
Strength note: A properly welded T-joint on 1/8-inch mild steel with full penetration fillets on both sides handles 3,000-5,000 pounds of load per inch of weld length before the base metal fails. The weld itself is almost never the weakest part of a properly made T-joint — the base metal tears first.
On my YesWelder MIG-PRO205DS running 0.030 Lincoln SuperArc L-56 on C25, a clean 1/8-inch T-joint sounds like frying bacon — steady, even, no popping. When the bacon starts skipping, the stickout has drifted or the work angle has tilted toward the flat plate. That single audio cue has saved me more re-grinds than any voltage chart.
Butt Joint — End-to-End Connections That Demand Tight Fit-Up
A butt joint connects the edges of two plates or sections in the same plane — end-to-end, edge-to-edge, or plate-to-plate on the flat. Butt joints are the most penetration-sensitive joint because the weld must fuse through the full thickness of both pieces, not just bond to their surfaces. A fillet weld on a T-joint has two perpendicular faces to fuse into; a butt joint has only the edge thickness of both plates, and if the root opening (gap between the plates) is wrong, the weld either fails to penetrate or burns through.
When to use it: Joining plate sections to make a larger plate (wider fire pit ring, longer tabletop), repairing a cracked steel bracket end-to-end, connecting pipe or tube sections inline. Butt joints carry tension and compression loads along the joint line — pulling the plates apart or pushing them together.
Root gap requirement: A 1/16-inch (roughly the thickness of a MIG wire) gap between the plate edges is standard for full-penetration butt joints on 1/8-inch steel. No gap produces a surface bead with no penetration through the back side. A 1/8-inch gap on thin material guarantees burn-through. The gap is set with a piece of MIG wire as a feeler gauge or a specific gap-setting shim.
Common beginner issues: (1) No root gap — the bead sits on top of both plates with zero penetration through the joint, and the finished piece snaps at the weld line under load. (2) Excess root gap — the puddle falls through the gap and the weld requires grinding out and redoing, or backing with a copper or aluminum chill bar (which the puddle will not stick to). (3) Misaligned plates — one plate sits higher than the other, creating a step that concentrates stress at the weld toe. Tack both ends before running the full bead and check alignment after the tacks.
My first butt joint — a fire-pit ring segment — had zero root gap. The plates were dead-flush. The bead looked beautiful from the top and snapped at the seam the first time I leaned on it. I learned to set the gap with a snipped piece of MIG wire as a feeler before tacking, and the next ring stayed in one piece all winter.
Lap Joint — The Easiest Joint, Overused by Beginners
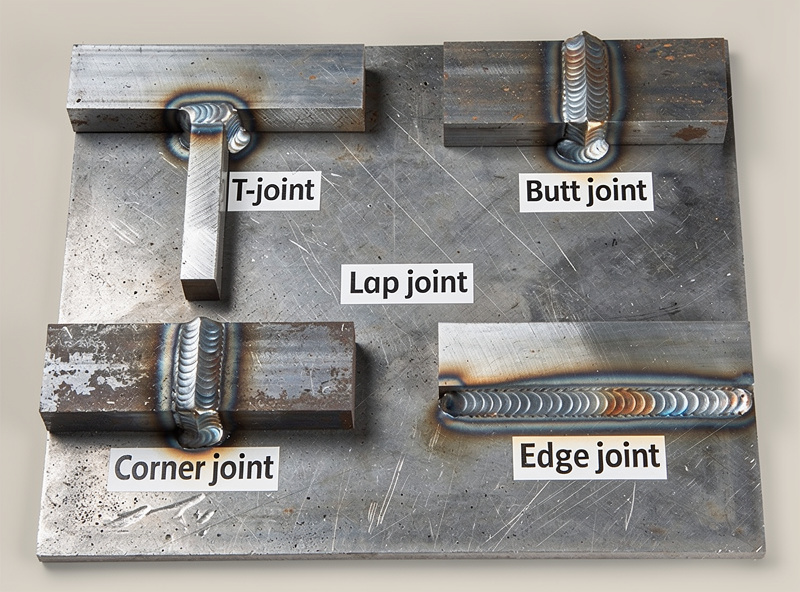
This is the joint I promised to name in the intro: lap joints. A lap joint overlaps two pieces — one plate or bar sits on top of another, and the weld is deposited along the edge of the top piece where it meets the surface of the bottom piece. Lap joints are the easiest joint to fit up (no alignment, no root gap) and the hardest to screw up the welding on — which is exactly why beginners overuse them. A project with all lap joints is heavier than necessary (every joint adds the thickness of the top plate as dead weight) and has built-in stress concentrators at every lap edge. My early welding cart had three lap joints I should have built as T-joints — it still rolls, but every lap edge is a future fatigue crack waiting for enough years and enough cycles.
When to use it: Doubler plates (reinforcing a thin section with a thicker plate), attaching a bracket to a flat surface where a T-joint is not possible, lap-splicing two bars that overlap in length, repair patches over cracked sections. Lap joints carry shear loads — the weld resists the two plates sliding apart sideways.
Weld size rule: The fillet weld throat (the distance from the root of the joint to the face of the bead) should equal the thickness of the thinner plate for full strength. A 1/8-inch plate lap joint needs a 1/8-inch fillet throat — achievable with a single pass on most home MIG welders.
Common beginner issues: (1) Welding only the visible edge of the top plate while ignoring the edge of the bottom plate — the arc melts into the top edge but sits on top of the bottom plate surface with no penetration. Angle the gun to split heat equally between the edge of the top plate and the surface of the bottom plate, roughly 30-40 degrees from vertical leaning toward the bottom plate. (2) Overlap joints that are too short — a lap joint shorter than twice the material thickness cannot develop full weld strength because there is not enough bonded area. A 1/8-inch plate lap joint should overlap at least 1/4 inch, and the weld should be at least 1/4 inch long.
Corner Joint — Outside and Inside Corners Are Different
A corner joint connects two pieces at their edges to form an L-shape — either an outside corner (the weld is on the outside of the L, like the corner of a steel box) or an inside corner (the weld is inside the L, like the interior of a box frame). Outside corner joints are the most challenging for beginners because the puddle tends to sag or drip off the edge, and burn-through at the corner tip is common.
When to use it: Steel box and enclosure corners, sheet-metal cabinets and trays, square-tube frame corners, the corners of a fire pit ring where plate edges meet. Outside corners carry bending loads — the joint resists the two plates being folded together or pulled apart. Inside corners carry similar loads but with the weld protected inside the structure.
Technique difference:
Outside corner: Use a push angle with reduced voltage (one step lower than flat-plate welding for the same thickness) and faster travel speed because the edge heats up faster than flat-plate. The weld puddle naturally wants to sag downward — keep the torch pushing forward and do not pause at the corner tip. On thin material (under 1/8 inch), tack-weld every 1-2 inches instead of running a continuous bead. The sim rig frame guide covers outside corner technique on square tube.
Inside corner: This is effectively a T-joint where both legs are equal. Use the same 45-degree work angle as a T-joint, but be aware that the confined corner concentrates heat — reduce voltage slightly or increase travel speed to avoid burning through the thinner of the two pieces.
Common beginner issues: Outside corner burn-through at the very tip of the corner — the thinnest part of the edge melts away first. Fix by starting the bead 1/8 inch away from the corner tip and welding toward it, or by welding away from the corner tip with a tack at the tip to hold it together. On square tube, weld the four corners in a skip sequence (corner 1, corner 3, corner 2, corner 4) to minimize distortion. The first square-tube box I built warped diagonally because I welded the corners in clockwise order — the heat input was cumulative and the frame pulled itself into a parallelogram. The skip sequence is the fix; learn it before the first box. There is a full breakdown of exactly how to sequence welds to cancel distortion in the welding distortion control techniques guide, including backstep welding, pre-setting, and the clamp patterns that work for thin sheet metal versus structural steel.
Edge Joint — The Specialist Joint for Sheet Metal
An edge joint welds the edges of two parallel or nearly parallel plates — the edges are butted together or slightly overlapped, and the weld fuses both edges into a single seam. Edge joints are uncommon in structural home welding but appear frequently in sheet-metal fabrication — automotive body panels, ductwork, thin-gauge enclosures, and any application where two thin sheets join at their edges rather than their faces.
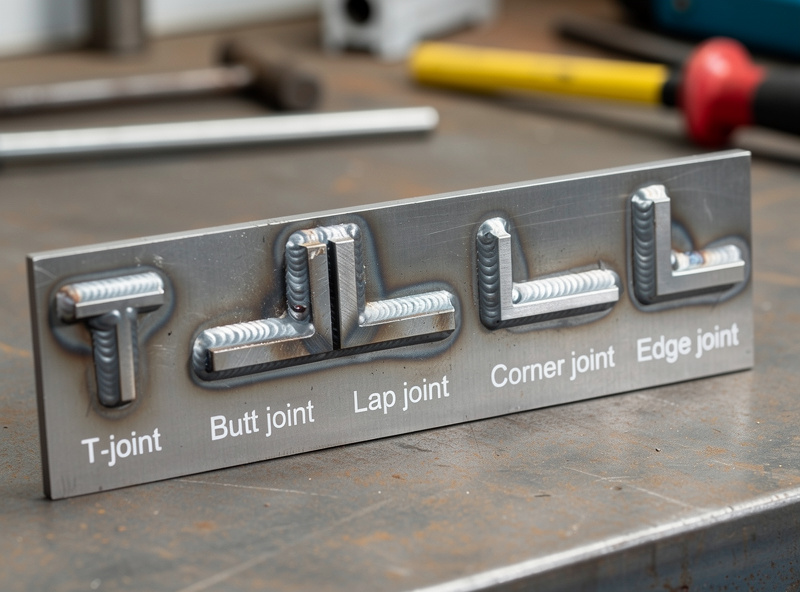
When to use it: Joining the flanges of two sheet-metal panels, the edges of a tubing seam, or the perimeter of a thin-gauge enclosure. Edge joints carry shear and tension loads along the seam line and are common in automotive and HVAC fabrication more than home structural welding.
Technique: Edge joints on 16-gauge or thinner material require the lowest voltage setting available and a fast travel speed to avoid instantly melting the edges into a blob. Tack-weld every 2-3 inches along the seam before running any continuous beads. On 1/8-inch or thicker material, edge joints can be welded similarly to butt joints with a small root gap for penetration.
Common beginner issues: Instant edge melt-back — the corner of the plate disappears into the puddle faster than the filler metal arrives. Fix by running the lowest voltage, highest travel speed possible, and using 0.023-inch wire instead of 0.030-inch for better control of heat input at low amperage. Alternatively, convert the joint to a lap joint by overlapping the edges instead of butting them — a lap joint on thin material is far more forgiving. On my YesWelder MIG-PRO205DS, I keep a second spool of 0.023 Lincoln SuperArc L-56 in a sealed bag for sheet-metal sessions; switching wire sizes is a 10-minute swap and worth the trouble on 16-gauge or thinner.
Joint Selection Guide for Common Home Projects
Here is which joint to use for the most common home welding projects — matching the joint to the load type and material:
| Project | Primary Joint | Why |
|---|---|---|
| Welding cart frame | T-joint | Angle-iron corners are all T-joints |
| Fire pit ring | Butt joint | Plate segments joined end-to-end into a ring |
| Workbench leg frame | T-joint + corner | Legs to crossbars = T; leg corners = outside corner |
| Trailer hitch carrier | T-joint + lap | Frame members = T; deck-to-frame = lap |
| Bracket repair | Lap joint | Doubler plate over cracked area |
| Steel box / enclosure | Corner joint | All four corners are outside or inside corners |
| Garden gate frame | T-joint | Vertical stiles to horizontal rails = T |
| Pipe/tube inline splice | Butt joint | End-to-end connection in the same axis |
| Sheet metal patch | Lap or edge joint | Lap for strength; edge for flush appearance |
| Sim rig / desk frame | T-joint + corner | All structural joints are T; visible corners may be outside corner |
For the specific projects listed above, the 10 first welding projects guide covers the build sequence in skill-building order. For troubleshooting when a joint goes wrong, the welding troubleshooting guide covers defect identification.
If I Had One Rule From 50 Joints’ Worth of Mistakes
Tack opposite corners first, then check square before you commit to the full bead. The first tack is the cheap one — you can grind it off and reset. The fifth bead, run on an out-of-square frame, is the one that ruins the project. Set the gap with a snipped piece of MIG wire as a feeler, tack diagonally, square the frame with a framing square or diagonal measurement, then weld. The technique is boring. The frame stays straight.
If I were starting again today, I’d run the first 50 practice beads as T-joints on 1/8-inch angle iron scrap before touching butt or lap joints. T-joints teach the gun angle, stickout, and travel-speed habits that transfer to every other joint. Butt joints punish bad fit-up. Lap joints reward laziness and quietly weaken every project. The order matters more than the technique itself.
Frequently Asked Questions
What is the strongest welding joint for structural projects?
A double-sided T-joint fillet weld on both sides of the vertical leg is the strongest common joint for structural home welding. The weld is loaded in shear, not tension or bending, and the base metal fails before the weld. For tension loads, a properly penetrated butt joint with full root fusion matches the base metal strength.
Which welding joint is easiest for beginners to learn first?
The T-joint on 1/8-inch angle iron is the easiest joint to learn because both pieces support each other during welding, the 90-degree angle provides a natural guide for gun angle, and fillet weld puddle control is more forgiving than butt joint penetration control. Start with T-joints, then progress to butt joints.
What is the minimum overlap for a lap joint?
A lap joint should overlap by at least twice the material thickness for full strength development. A 1/8-inch plate lap joint needs at least 1/4 inch of overlap, and the weld length should equal or exceed the overlap length. Overlap that is too short concentrates stress at a single weld line.
How much root gap should a butt joint have for full penetration?
A 1/16-inch root gap — roughly the thickness of standard MIG wire — is the standard for full-penetration butt joints on 1/8-inch to 1/4-inch mild steel. No gap produces a surface bead without penetration. A wider gap (1/8 inch or more) causes burn-through unless you use a backing bar.
Do I need to bevel thick plates before welding a butt joint?
For plate thicker than 1/4 inch, yes — bevel the edges at 30-45 degrees (60-90 degree included angle) to create a V-groove that the weld can fill to achieve full penetration. Plates 1/4 inch and under can be welded square-edged with a 1/16-inch root gap on most 200A-class home MIG welders.
What is the best joint for welding thin sheet metal without burning through?
A lap joint is the most forgiving for thin sheet metal (under 1/8 inch) because the overlapping material acts as a heat sink and the puddle has more surface to wet into. Use the lowest voltage setting, fastest travel speed, and tack-weld every 1-2 inches instead of running a continuous bead to avoid burn-through.
Related Articles
- Welding for Beginners: Complete Guide
- MIG Welding Complete Guide
- 10 First Welding Projects That Teach Core Skills
- Welding Terms Glossary
- Common Beginner Welding Mistakes
- Gas vs Gasless MIG Explained
- Welding Troubleshooting Guide
- DIY Welding Projects Guide
- MIG Welding Settings Chart
- About Kenny Nyhus Fadil


Discussion (0)