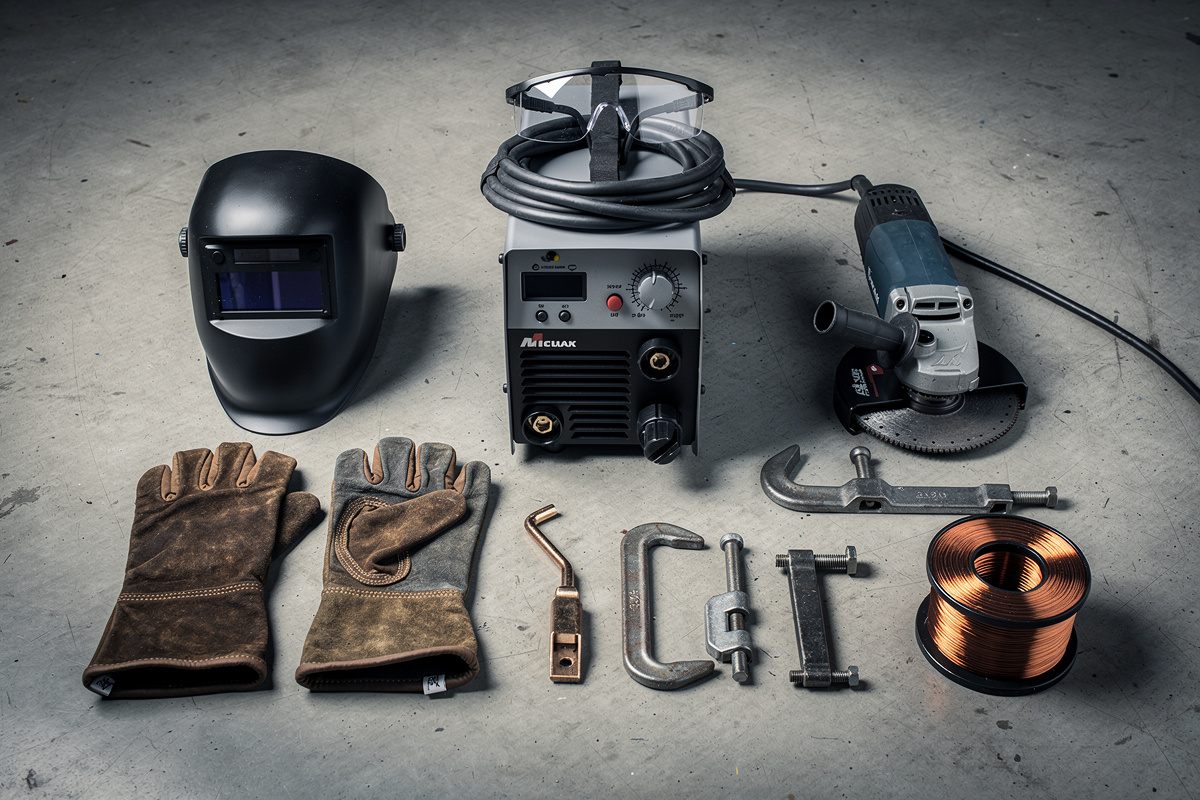
A first-year welding equipment checklist covers the welder, auto-darkening helmet, leather gloves, angle grinder, clamps, and consumables. Total cost for a complete MIG setup is $400-$800, and every item earns its place within the first month of practice if you spend the year actually welding.
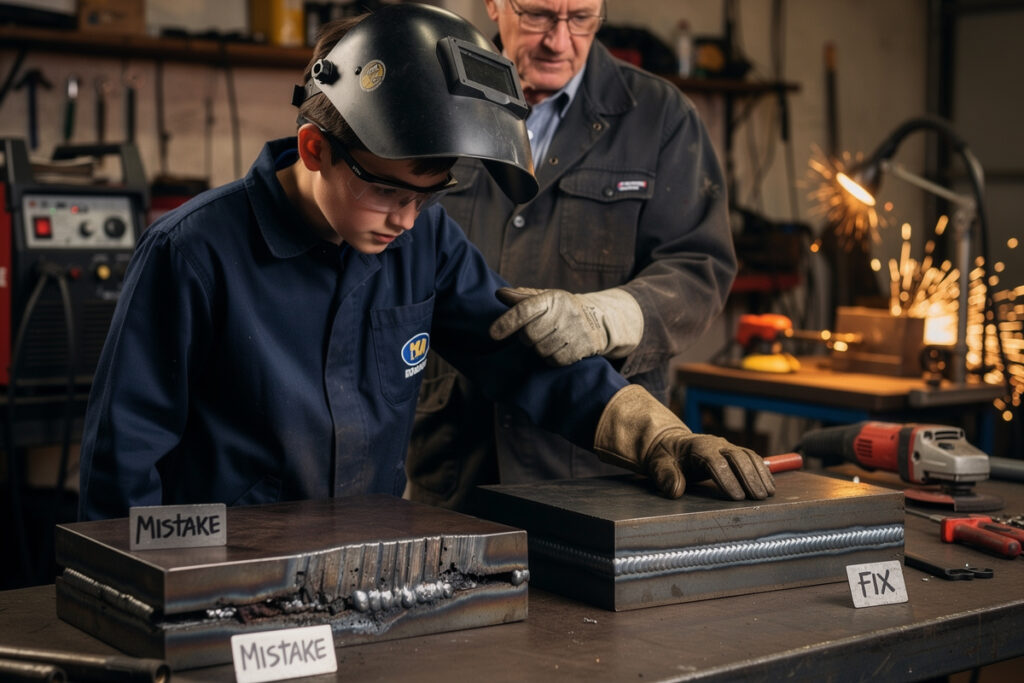
I underbought my first welder setup — went home with a 90-amp 110V unit and no helmet because I planned to “shop more later” — and made it through 20 minutes of trying to weld 1/8″ steel before walking back to the supply store for a $90 helmet and a working welder. This list is what I wish someone had handed me on day zero. Buying without a checklist leads to one of two problems: overspending on gear you do not need yet, or discovering mid-project that you are missing a critical tool. For broader context, see the welding for beginners guide and the essential welding equipment guide.
Must-Have Equipment Before Your First Weld
Five items are non-negotiable before you strike your first arc: a MIG welder, auto-darkening helmet, welding gloves, safety glasses, and a grounding clamp. Without any one of these, you either cannot produce a weld or cannot do so safely.
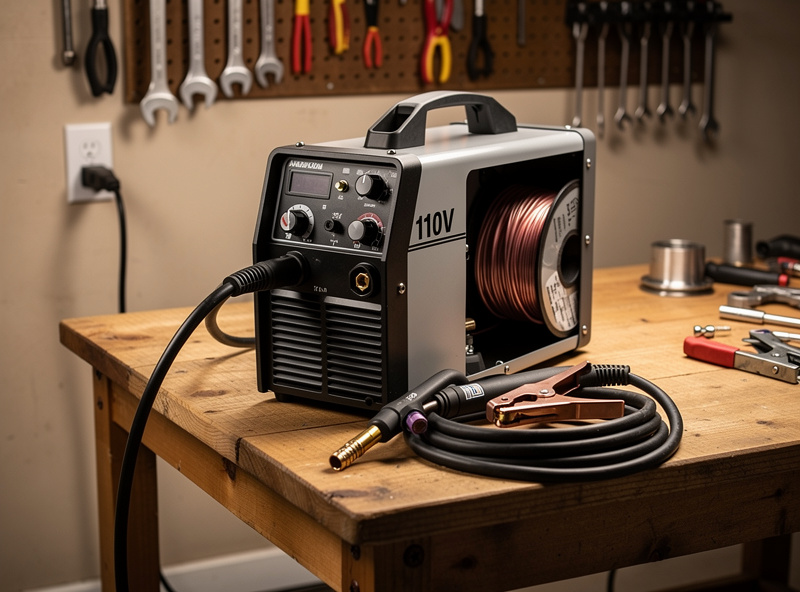
The welder is the biggest purchase. For beginners on a budget, a 110V MIG welder in the $200-$350 range handles 1/8-inch mild steel comfortably. Look for a unit with infinite voltage control (not just 4-6 fixed settings) and a wire feed speed dial. Brands like Eastwood, Forney, and Lincoln Electric all make reliable beginner MIG machines in this price range. Avoid the cheapest import welders under $150 — their wire feed mechanisms jam frequently and their duty cycle ratings are often overstated.
An auto-darkening helmet in the $40-$100 range is the second most important purchase. The helmet must have adjustable shade settings (shade 9-13), sensitivity adjustment, and a grind mode. Fixed-shade helmets cost less but make bead starting harder because you cannot see the joint before the arc strikes. Every hour you spend fighting a fixed-shade helmet is an hour of wasted practice time.
Leather MIG welding gloves cost $15-$30 and should fit snugly enough to feel the trigger through the leather. Oversized gloves reduce trigger control and make it harder to maintain consistent wire feed. Do not use mechanic’s gloves, gardening gloves, or TIG gloves for MIG work — they lack the heat resistance for sustained welding.
A basic C-clamp or spring clamp grounds your workpiece to the welding table. Most welders ship with a grounding clamp, but the included clamp is often flimsy. A heavy-duty ground clamp ($10-$15) with copper jaws maintains better electrical contact and prevents the inconsistent arc that comes from a loose ground connection.
Safety glasses are worn under the helmet as a secondary layer of eye protection. Even auto-darkening helmets occasionally flash due to low battery or sensitivity misconfiguration. A $5 pair of ANSI-rated safety glasses prevents the corneal burns that result from unexpected UV exposure.
Tools You Will Need Within the First Month
Within your first month of welding, you will need an angle grinder, a set of C-clamps or locking pliers, a steel tape measure, a soapstone marker, and a wire brush. These tools support metal preparation, joint fit-up, and post-weld cleanup — the steps that happen before and after the actual welding.
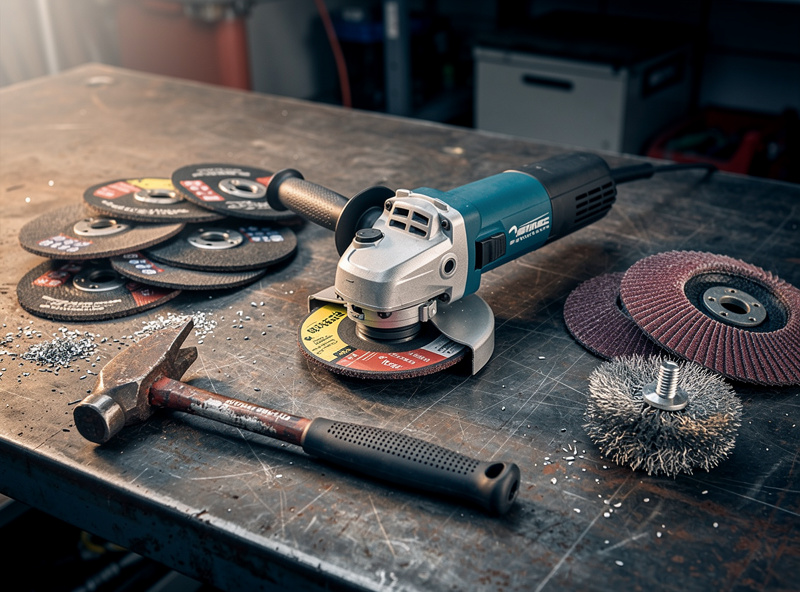
An angle grinder ($30-$60) with a cutoff wheel and a flap disc handles 90% of metal cutting and grinding tasks for beginner projects. The cutoff wheel cuts flat bar, angle iron, and square tubing to length. The flap disc grinds weld beads smooth, removes spatter, and prepares surfaces for painting. Buy a 4.5-inch grinder — it is the standard size with the widest selection of accessories.
C-clamps and locking pliers (Vise-Grips) hold workpieces in position during welding. You need at least four clamps: two C-clamps for the welding table and two locking pliers for holding pieces at 90 degrees. Welding magnets ($10-$15 for a set of three) hold pieces at 45 and 90 degree angles and free up your hands for tacking.
A soapstone marker ($2-$4) marks cut lines on metal that stay visible during welding — pencil and pen marks burn off immediately. A steel tape measure ($5-$10) and a combination square ($10-$15) ensure accurate cuts and 90-degree joints. Inaccurate measuring is the number one cause of beginner projects that do not fit together.
A chipping hammer ($5-$10) and wire brush ($3-$5) clean slag from stick welds and remove spatter from MIG welds. Even gas-shielded MIG produces some spatter that needs removal before painting. Keep these tools within arm’s reach of your welding position — walking across the shop to find a wire brush breaks your workflow and cooling joints.
Consumables to Stock Before Starting
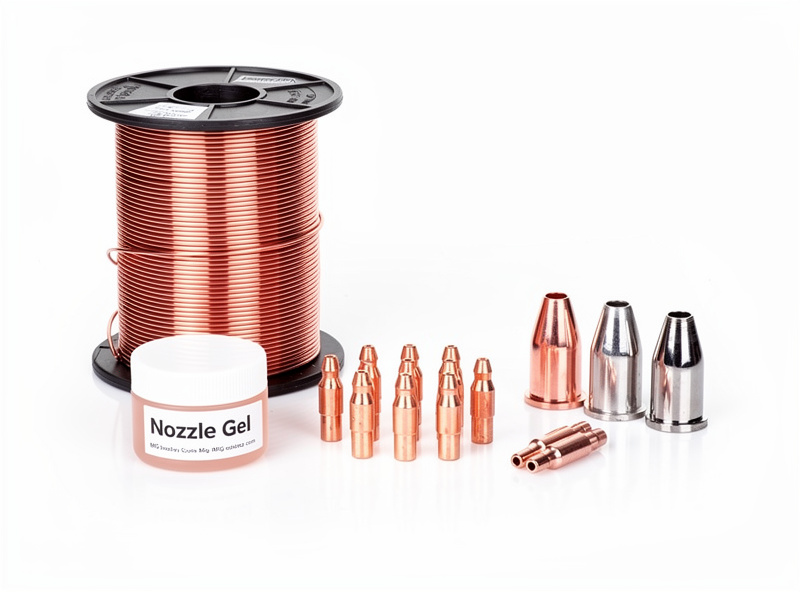
Stock these consumables before your first welding session: 2 pounds of 0.030-inch ER70S-6 solid MIG wire, 10 contact tips (0.030), 2 nozzles, and 1 nozzle gel. These items are used up during welding and running out mid-project means a store trip or online order wait.
Contact tips are rated for roughly 100 pounds of wire fed before bore erosion starts causing erratic wire feed, but few home tips actually die of pure wear — they get retired earlier from a bent tip after a bump, spatter clogging the bore, or a wire-diameter change. At beginner practice volumes (1-2 pounds per month), wear alone would stretch a single tip well past a year; the 10-pack is really there to cover those earlier losses and any diameter swaps, not raw consumption. Contact tips cost $5-$10 for a 10-pack and are specific to your wire diameter — buy 0.030 tips for 0.030 wire (source).
Nozzles last longer than tips but accumulate spatter that restricts shielding gas flow. Clean the nozzle after each welding session by dipping it in nozzle gel (anti-spatter compound) while it is still warm. Replace the nozzle when spatter buildup cannot be cleaned off — roughly every 20-30 hours of welding.
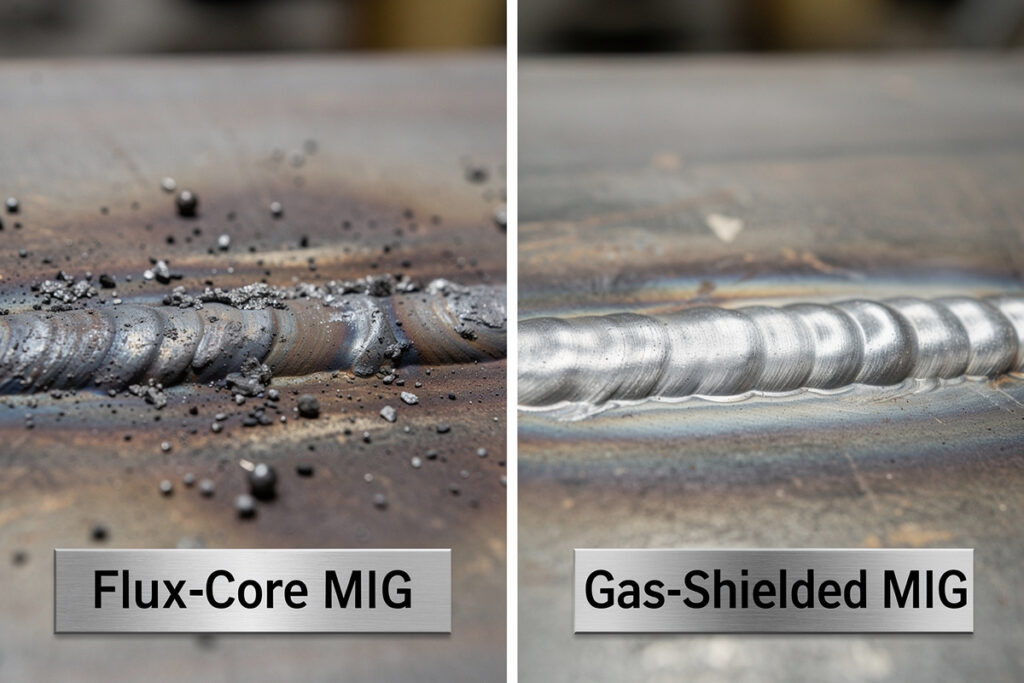
If using gas-shielded MIG, a 80-cubic-foot cylinder of 75% argon / 25% CO2 (C25) costs $120-$180 for the first fill (including cylinder deposit) and $25-$40 for subsequent refills. The cylinder lasts 4-6 months of weekend welding. If starting with flux-core MIG (no gas), skip the cylinder and buy 2-pound spools of 0.030-inch flux-core wire ($15-$25 per spool).
What Can Wait Until You Have 20+ Hours
These items improve your welding but are not needed for basic practice: a welding table, positioner, metal bandsaw, plasma cutter, and dedicated fume extractor. Use what you already have for the first month and upgrade based on the projects you actually build.
A proper welding table ($150-$500) makes clamping easier and provides a flat, grounded surface. But a steel plate on sawhorses or even the garage floor works for flat-position practice beads. Invest in a welding table only after you are building projects that require out-of-position welds.
A horizontal bandsaw ($150-$250) cuts metal faster and more accurately than an angle grinder with a cutoff wheel. But the angle grinder handles beginner project cuts just fine. Upgrade to a bandsaw when you find yourself cutting more than 20 pieces per project — the time savings become significant at that volume.
A plasma cutter ($300-$600) cuts any thickness of metal cleanly and quickly. Beginners do not need one — an angle grinder with a cutoff wheel handles material up to 1/4 inch. Plasma cutters become worthwhile when you are cutting shapes from plate steel or working with material thicker than 3/8 inch regularly.
Complete beginner guide: equipment, costs, safety, and first projects
The Single Item Most Worth Upgrading
If your budget stretches for one premium upgrade down the road, it’s the helmet. The $40-$60 helmet tier triggered arc eye on me twice in my first month from sensor lag and battery undervolt. Stepping up to a top-tier helmet — Lincoln Viking 3350 and Optrel Crystal 2.0 both run roughly $470-$720 depending on the lens package — has worked five years without a single false-darkening incident on mine. That’s real money above the year-one $40-$100 starter budget, so treat it as a later upgrade once you know welding is sticking, not a first-purchase requirement. ANSI Z87.1+ certification is the minimum; pick the helmet you wear for 4+ hours per session over the welder you press a trigger on. A single arc-eye incident is genuinely miserable but almost always heals fully within a day or two with no lasting damage — it’s repeated, unprotected exposure over months or years that risks permanent harm, which is the real argument for not skimping on the helmet long-term (source).
Frequently Asked Questions
What equipment do I need to start welding at home?
A 110V MIG welder ($200-$350), auto-darkening helmet ($40-$100), leather MIG gloves ($15-$30), angle grinder ($30-$60), clamps ($20-$40), and consumables ($30-$60). Total startup cost: $400-$800 for a complete beginner MIG setup.
Can I weld without a welding table?
Yes. A steel plate on sawhorses or even the garage floor works for flat-position practice and beginner projects. Invest in a welding table after you are building projects that require out-of-position welds or multiple clamping points.
What size MIG welder should a beginner buy?
A 110V MIG welder with 140 amp output handles mild steel up to 3/16 inch thick — covering 90% of beginner projects. Avoid 90-amp units that struggle with 1/8-inch material and 220V units that require a dedicated outlet.
How much does MIG welding wire cost?
A 10-pound spool of 0.030-inch ER70S-6 solid wire costs $25-$40 and produces roughly 40-60 hours of welding at typical beginner usage rates. Flux-core wire costs $15-$25 per 2-pound spool.
Do I need a gas cylinder for MIG welding?
Not necessarily. Flux-core MIG wire (self-shielded) works without gas and costs less to start. Gas-shielded MIG produces cleaner beads with less spatter but adds $120-$180 for the first cylinder fill. Start with flux-core if budget is tight.
Related Articles
- Welding for Beginners Complete Guide
- Best Budget Welder Under $300
- Best Welding Helmet for Home Use
- Cost to Start Welding at Home
- How to Build a Welding Cart
- Essential Welding Equipment Guide
- Welding Consumables Guide
- Welding Safety Guide
- MIG Welding Complete Guide
- MIG Welding Settings Chart
- Welding Table Buying Guide
Discussion (0)