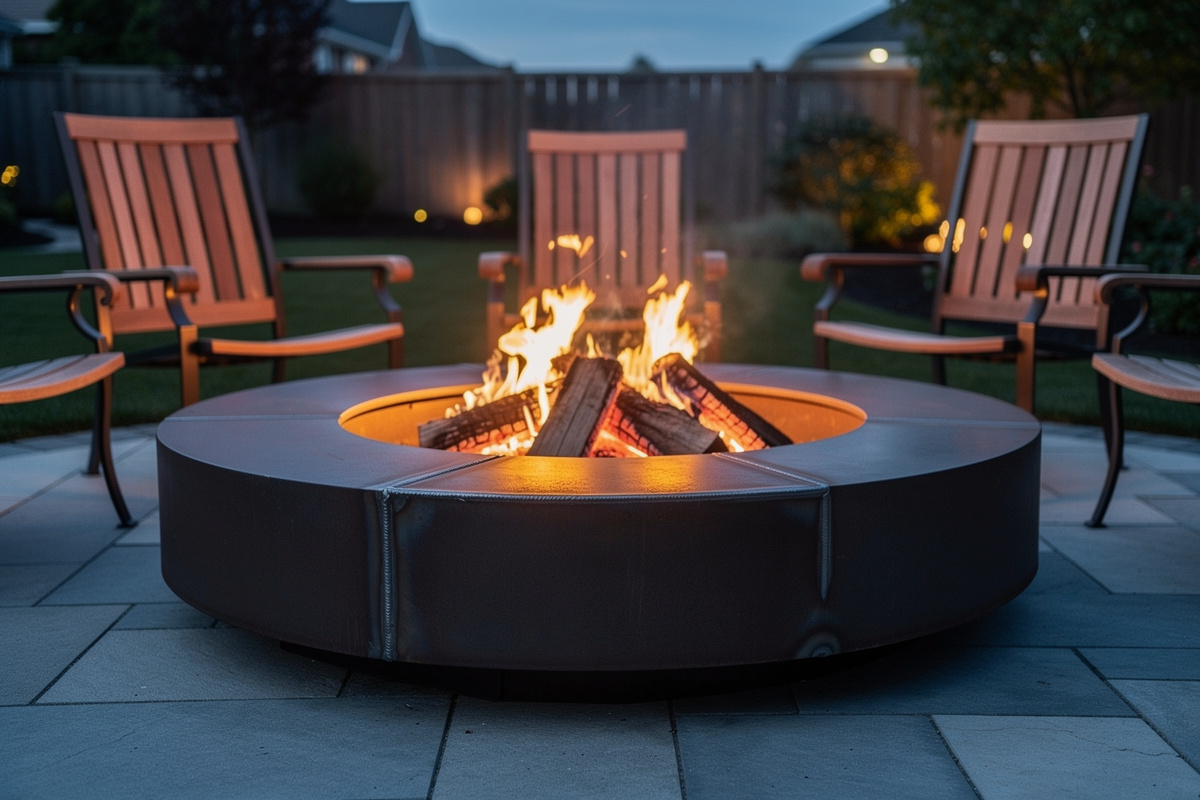
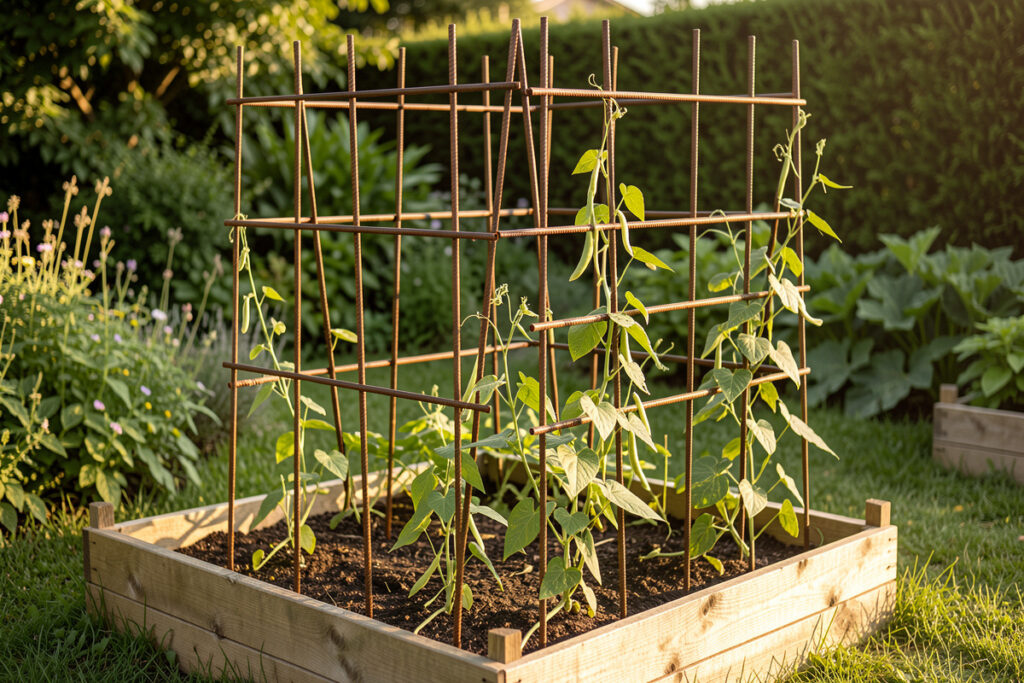
The simplest welded steel fire pit is a 30-inch hexagonal ring made from six 16×14-inch pieces of 1/4-inch mild steel plate plus a 30-inch round base — total material cost roughly $80-150, build time around 4-6 hours.
Welding a fire pit is the perfect first project: limited cuts, simple geometry, no precision tolerances, and the result is genuinely useful and shareable. Once you are comfortable with a simple structure like this, a welded steel workbench is the logical next step — the DIY welding workbench frame plans walk through the full build with cut lists and weld sequences. The first pit I welded eight years ago is still on my back patio, two repaints in, looking factory-new. The plan below produces a fire pit that lasts 10+ years outdoors with proper finish — the same design as commercial $400 units, built for under $150 in materials. For complete project context across the DIY range, see the DIY welding projects guide. Written by Kenny Nyhus Fadil.
Materials and Cut List
The hexagonal design uses six identical side panels and one round base. Mild steel works fine — corten weathering steel costs more but rusts to a stable patina rather than progressing through. Plate thickness of 1/4 inch is the right balance between heat resistance and weldability on a home MIG. Thinner steel (3/16″) warps under repeated heating; thicker (3/8″) is overkill and adds 30% to material cost. The first time I tried 3/16″ plate to save weight, the panels bowed visibly after the third fire and I welded reinforcing strips along each panel to recover stiffness — a 4-hour fix that 1/4″ plate would have prevented.

Cut list for 30-inch interior diameter pit (suitable for 4-person seating): 6 panels at 16 inches wide x 14 inches tall (1/4-inch mild steel), 1 base disc at 30 inches diameter (1/4-inch mild steel), 4 bottom drainage feet at 4 inches square (3/16-inch mild steel). Total weight about 145 pounds. A local steel supplier will cut all pieces from drop stock for $20-30; ordering pre-cut saves 4-6 hours of saw work and produces straighter edges than home cutting.
Tools and Consumables
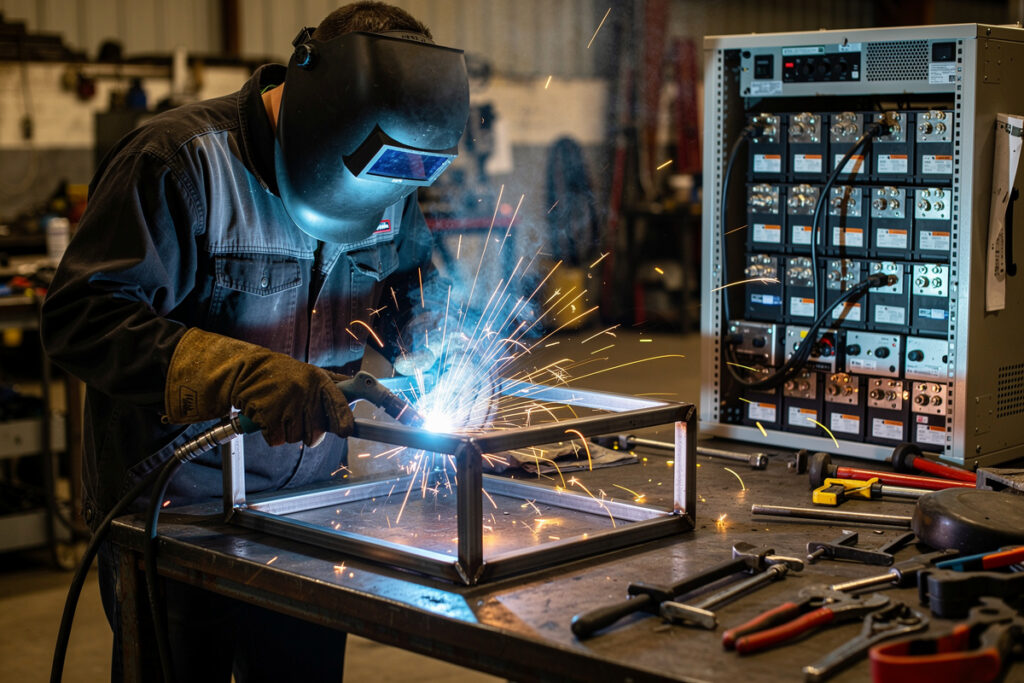
Required tools: 120V or 240V MIG welder (flux-core fine), auto-darkening helmet (ANSI Z87.1+ certified), leather gloves, angle grinder with flap discs and cutoff wheels, magnetic squares (4-6 of them — these are the difference between square and crooked), measuring tape, sharp soapstone or paint marker, framing square. Consumables for the build: 0.030 flux-core wire (E71T-GS per AWS A5.20, 1 pound per pit), grinding discs (3-4), flap discs (1-2), high-temperature paint (1 quart 1200°F BBQ paint).
Disclosure: HomeWelder is reader-supported. As an Amazon Associate I earn from qualifying purchases, at no extra cost to you. I only link gear I actually run in my own shop or would buy again.
The kit I reach for on a build like this: a DeWalt DWE402 angle grinder for cutting plate and dressing welds — one tool with a cutoff wheel, a flap disc, and a wire wheel covers most of this project; a set of magnetic welding squares, since four to six of them are genuinely the difference between a square pit and a crooked one; a spool of Lincoln NR-211-MP 0.030 flux-core wire, which runs clean enough outdoors for a build like this; and a pair of leather welding gloves (I run Tillmans). For the finish I use Rust-Oleum 1200°F high-heat BBQ-black — the same satin black called out in the cut list below.
On the welder itself: this build genuinely only needs a basic 120V flux-core machine, so don’t let anyone talk you into more just for a fire pit. My own shop welder is a YesWelder MIG-PRO205DS, and it has handled every project on this site. But if you are buying one machine to grow into — aluminum, thin sheet, and clean pulse control — the double-pulse models are worth the step up: the YesWelder Firstess DP200 (the flagship — 7-inch screen, full MIG/pulsed-MIG/flux/TIG/stick, 110/220V) if you want one machine to grow into, or the more affordable YesWelder YWM-211P double-pulse aluminum MIG if pulse-on-aluminum is the feature you are really after.
Total tool cost if not already owned runs $400-700 (the welder being most of it). Material cost for one pit is $80-150 depending on local steel prices and finish choice. The pit will repay itself in social value within one outdoor gathering. Browse the essential welding equipment guide for specific welder, helmet, and grinder recommendations.
Step 1: Prep and Layout
Wipe each piece down with acetone or denatured alcohol to remove mill scale oil — this prevents porosity in the welds. Mark the panel positions on the base disc by drawing a hexagon centered on the disc with sides matching panel width (16 inches). Mark center reference lines on each panel — these become alignment reference for tack welding. Set up the welding area with magnetic squares laid out at the marked panel positions. Per NFPA 51B, clear combustibles 35 feet from the work area before you spark up — the first time I rushed this step, a pile of cardboard packaging caught a single spatter and turned an afternoon project into a fire-extinguisher event.
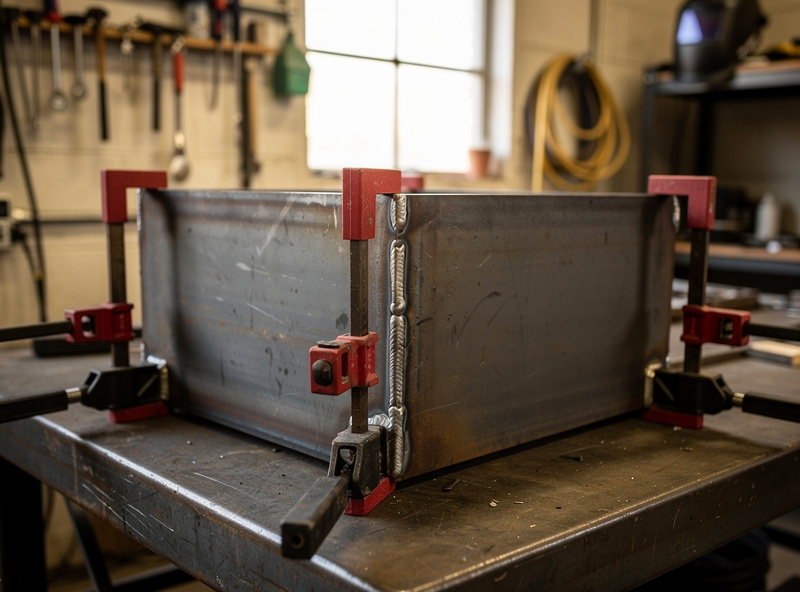
Tack-weld the first two panels at 120-degree internal angles to each other, then add adjacent panels one by one, each tacked at the bottom (where it meets the base) and at both vertical edges to the previous panel. Use the magnetic squares to enforce true 90-degree vertical and 120-degree internal angle. Tacks are short — half-inch beads at each joint, just enough to hold position. Do NOT run continuous welds yet; the assembly needs all six panels in place before final welding to manage heat distortion.
Step 2: Final Welds
With all six panels tacked in position, run continuous welds along each vertical seam between adjacent panels and along the base where each panel meets the disc. Standard settings on a 120V MIG with 0.030 flux-core: 18-22 volts, wire speed 250-300 IPM, work angle 45 degrees from vertical, push direction. Run 3-4 inch bead segments and let the steel cool to room temperature between segments to prevent warp. Listen for the steady frying-bacon hiss; popping or sputtering means the wire feed is too fast or stick-out is wrong.
Total weld length is roughly 8 feet across all seams. Beginners working slowly will need 2-3 hours just for the welding pass. Stop and let the assembly cool completely if any panel starts to warp visibly — distortion grows exponentially as heat accumulates. Fix mid-build distortion with a hammer and a rosebud propane torch on the high spots; preventing it with cooldown breaks is easier than fixing it later. Reference the MIG burnback troubleshooting guide if your welds start sputtering during the pass, and the MIG welding settings chart for voltage and wire-speed combinations on every common steel thickness.
Step 3: Cleanup and High-Temperature Finish
Knock slag off all welds with a chipping hammer, then wire-brush each bead. Grind any spatter or rough edges with a flap disc — fire pits are display objects, so the finish quality matters. Drill four 1/2-inch holes through the base for drainage (water that collects rusts the base from underneath in 12-18 months without drainage). Bolt or weld the four feet to the underside.
Apply 1200°F BBQ paint (Rustoleum makes a satin black version that lasts 2-3 years outdoors). Two coats with 24-hour cure between, then a final cure by lighting a small fire inside and letting it burn for 60 minutes — heat-curing the paint locks it into the steel. Do this outdoors with good ventilation; the paint releases solvent vapor during the cure. After cure, the pit is good for use. Always practice the welding safety protocol for grinding and finishing — sparks from the grinder are a fire ignition source, and OSHA 29 CFR 1910.252(a) requires a fire watch maintained 30 minutes after the last cut. The full fire clearance protocol — 35-foot radius, fire watch timing, extinguisher placement, and what to cover — is in the welding fire safety rules guide.
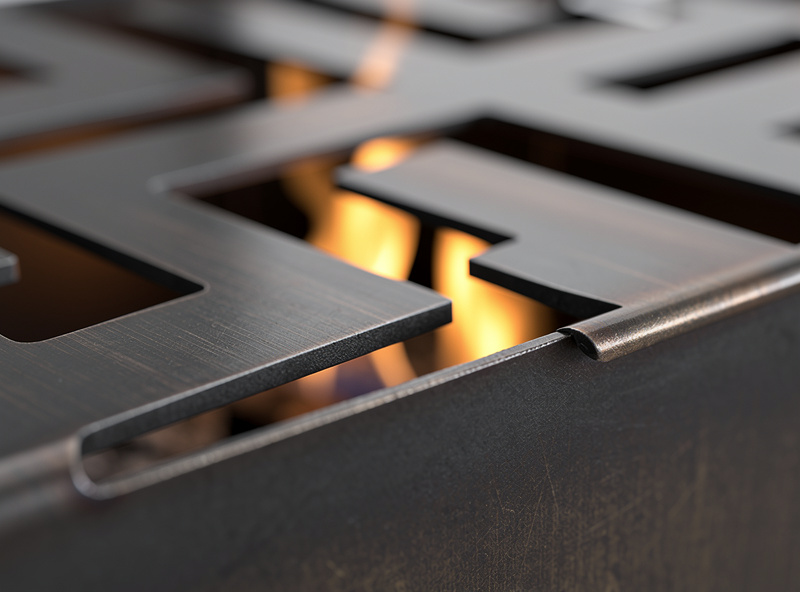
Optional Decorative Cutouts
The most popular customization is decorative cutouts in the side panels — geometric patterns, silhouettes, or text that glow when fire is burning inside. Cutouts require either a plasma cutter (preferred — clean edges) or a jigsaw with metal-cutting blades (slow but works). Stencil designs onto the panels with paint marker before tacking, then cut before assembly. Cutout area should not exceed 30% of any panel surface, or panel rigidity drops too far.
Plasma-cut cutouts on 1/4-inch steel take 5-15 seconds per linear inch on a 30A unit. Jigsaw cuts on the same thickness take 4-8 minutes per linear foot. Either way, deburr cutout edges with a flap disc — sharp edges from cutting are a finger-cut hazard during assembly. The decorative cutout pattern adds 1-2 hours of build time and dramatically improves the visual result. For comparison, the plasma cutter vs angle grinder piece walks through cut-rate and finish trade-offs on this exact material thickness.
Cut List Reference Table — 30-inch Hex Fire Pit
| Part | Quantity | Material | Dimensions | Approx cost |
|---|---|---|---|---|
| Side panel | 6 | 1/4″ mild steel plate | 16″ x 14″ | $60 total |
| Base disc | 1 | 1/4″ mild steel plate | 30″ diameter | $30 |
| Drainage feet | 4 | 3/16″ mild steel | 4″ x 4″ | $8 |
| Flux-core wire | 1 lb | 0.030 E71T-GS (AWS A5.20) | — | $10 |
| Grinding/flap discs | 4-6 | 4.5″ abrasive | — | $15 |
| 1200°F BBQ paint | 1 quart | Satin black | — | $15 |
| Total materials | — | — | — | $140 |
The Single Most Important Build Step
If you only do one thing right on a fire pit build, drill the four drainage holes in the base before you weld the feet on. The first pit I built had no drainage — water pooled at the base every winter and the underside of the disc rusted through in 14 months. The replacement disc cost more than the original steel order. Five minutes with a 1/2″ twist drill at the prep stage saves the entire pit from a 2-year service life. Everything else on this build (paint quality, weld appearance, cutout aesthetics) is secondary to that drainage detail.
Frequently Asked Questions
What thickness of steel do I need for a fire pit?
Use 1/4-inch (6mm) mild steel plate for the side panels and base of a backyard fire pit. Thinner steel (3/16 inch) warps under repeated heating cycles and develops cracks within 1-2 years. Thicker steel (3/8 inch) is overkill, adds 30% to material cost, and is harder to weld on home MIG welders. The 1/4-inch sweet spot lasts 10+ years with proper drainage and finish.
How much does it cost to build a DIY fire pit?
Material cost for a 30-inch hexagonal welded steel fire pit runs $80-150 depending on local steel prices — primarily 6 pieces of 16×14-inch 1/4-inch mild steel plus a 30-inch round base. The same design sells commercially for $300-500. Total tool cost if you do not already own a welder runs $400-700, but the welder pays itself off across multiple projects.
What welder do I need to build a fire pit?
A 120V flux-core MIG welder is sufficient for a 1/4-inch steel fire pit. Set the machine to 18-22 volts and 250-300 IPM wire speed for 0.030 flux-core wire. The Forney Easy Weld 140 at $230 handles this build comfortably. A 240V machine is faster but unnecessary — total weld length is only about 8 feet across all seams, well within a 120V duty cycle.
How do you keep a steel fire pit from rusting?
Drill 4 drainage holes through the base before final assembly and apply two coats of 1200°F BBQ-rated high-temperature paint after cleanup, with a 60-minute heat cure by lighting a fire inside. Drainage prevents water collection at the base; high-temp paint protects the exterior from oxidation. Properly finished pits last 10+ years outdoors with annual repaint of any worn spots.
How long does it take to build a welded fire pit?
A first-time builder takes 6-10 hours total: 1-2 hours for measuring, marking, and degreasing; 1-2 hours for tacking all 6 panels in position; 2-3 hours for continuous welding with cooldown breaks; 1-2 hours for slag removal, grinding, and finishing; 1 hour for paint application and heat cure. Experienced welders complete the same build in 4-5 hours.
Can you build a fire pit with flux-core wire?
Yes — flux-core MIG works well for fire pit construction on 1/4-inch mild steel. The flux produces enough shielding for outdoor weld quality, and the gasless setup is convenient. Expect more spatter and slag than gas-MIG, but the welds are mechanically sound. Use 0.030 E71T-GS flux-core wire, 18-22 volts, 250-300 IPM. Knock slag and spatter off after each pass for a clean appearance.
Discussion (0)